How To Customize Your WordPress Theme Using Custom CSS
Table of contents
Adding Custom CSS to your WordPress site helps in altering the look of your website. To begin with, every WordPress theme is developed using specific primary language components. These include PHP, HTML, CSS and JavaScript. PHP is used for the Backend code whereas HTML, CSS and JavaScript are used for the frontend. In summary, the latter three are used in rendering what the user sees in his or her browser.
At times while designing your WordPress powered site with a theme that you have installed, you may want to alter the look of certain sections or elements within the site. You may also want to have different looking website from what other theme users have in place. Whichever is the case, altering the look of the site would entail CSS.
Addition of custom CSS may seem easy for everyday WordPress users and developers, but it may not be quite an easy and straight-forward process especially for the first time web developers.
Within this article, we will look into what is CSS as well as some of the ways that you can use to add Custom CSS to your website.
What Is CSS
CSS stands for Cascading Style Sheet. It is a web language that is used in styling HTML elements within your website. Basically the front-end components within your website that you see in your browser are built using HTML. In order to style these elements for a proper visual display to users, you will need utilize CSS for this. CSS therefore works hand in hand with HTML in order to properly render elements within the front-end.
A sample application of CSS can be seen within our staxwp.com website. On the front page, we have the a title where some of the text within it is highlighted as seen below:
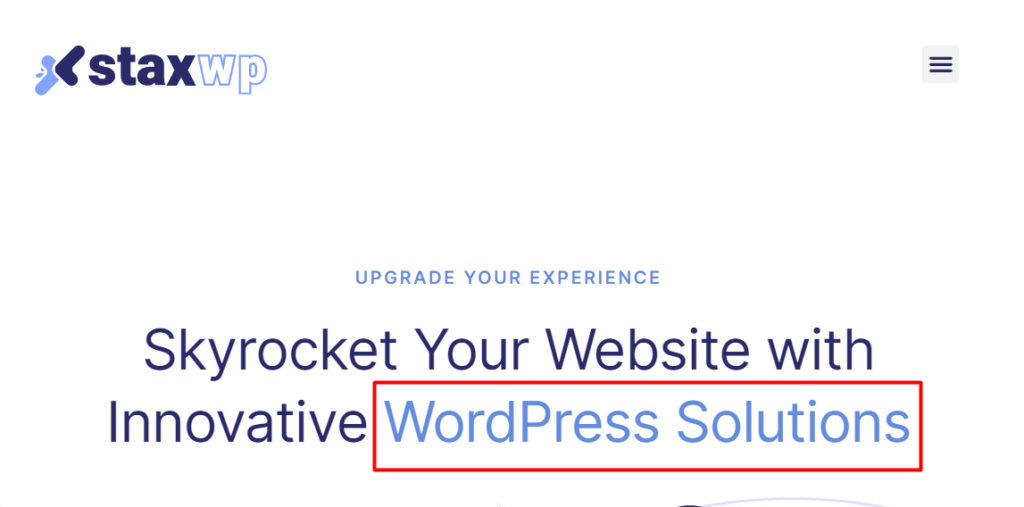
CSS is used to alter the color of the highlight text which is why the display seems different from the rest of the text.
This is just one of the many ways that CSS can be applied across different elements. You can also have CSS to alter the color of links, font sizes to text, add outlines to various elements and many more properties.
In most WordPress themes following WordPress coding standards, the theme CSS code is stored within the style.css file. This file is located within the root of your theme files.
How To Identify The CSS To Customize
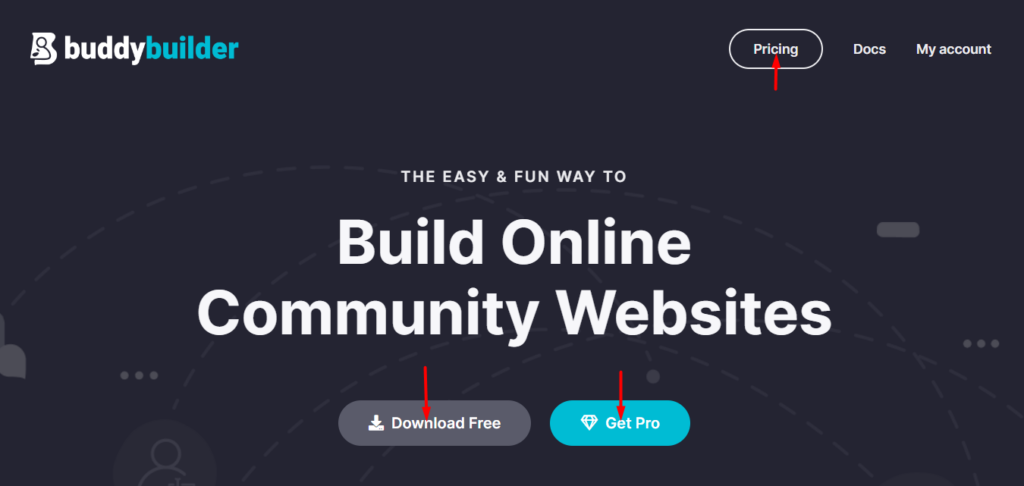
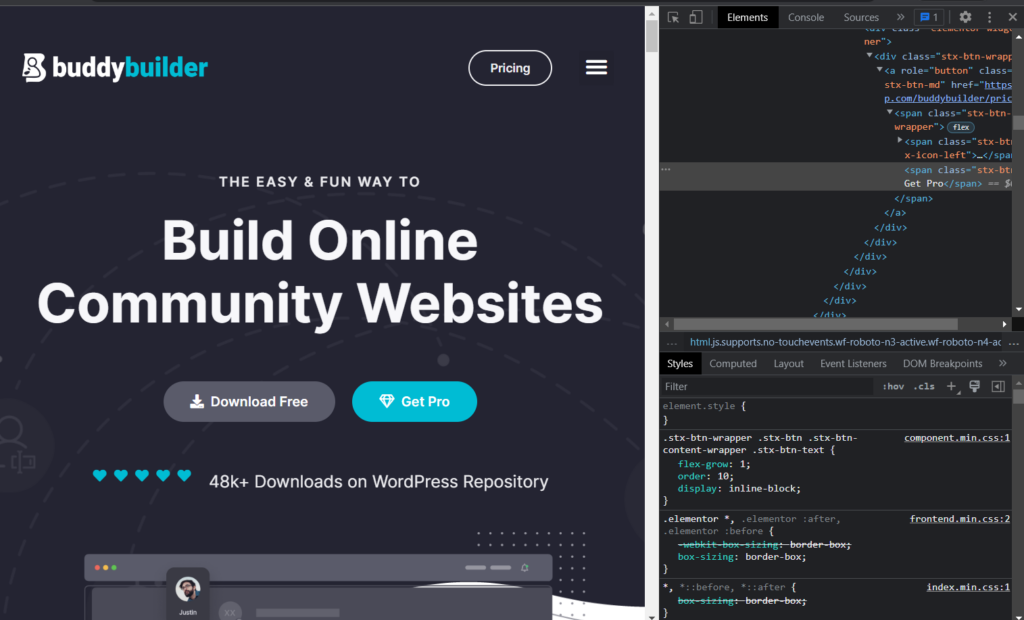
In order to identify the CSS to customize, you will need to first identify the element or content that you need to apply the styling to. Lets say that for example we would wish to alter the button text colors within our product page here or else the text in the illustrated buttons below:
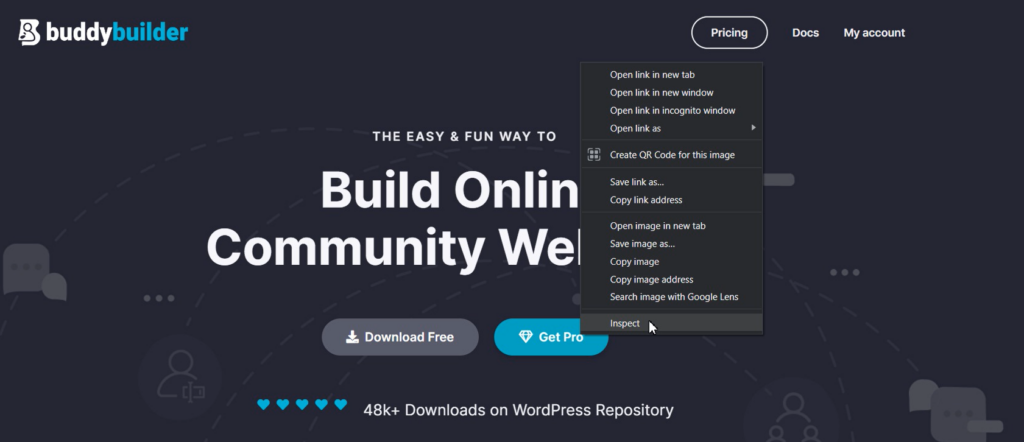
To do so, you will need to use developer tools. We recommend using a browser such as Google Chrome or Firefox for you to easily and properly utilize these tools. In our case here, we will be utilizing the Google Chrome browser.
In order to use these tools, you will need to “inspect the element” first. To achieve this for our button text, right click on one of the text within the button elements and select the “inspect” option. Below is a sample screenshot on this:
A Dev tools panel with a number of tabs will then be rendered.
Within the screenshot, you will notice that there are two tabs that are rendered in first view. These are “Elements” and “Styles”. In other browsers, these may be named differently.
If you properly inspected the element, you will have a view of the button text whose text property we would like to alter, within the Elements tab.
Since in our case here we are only interested in altering the text color property to the buttons, we can either carry out the following:
1. Click on the “New Style Rule” icon illustrated below:
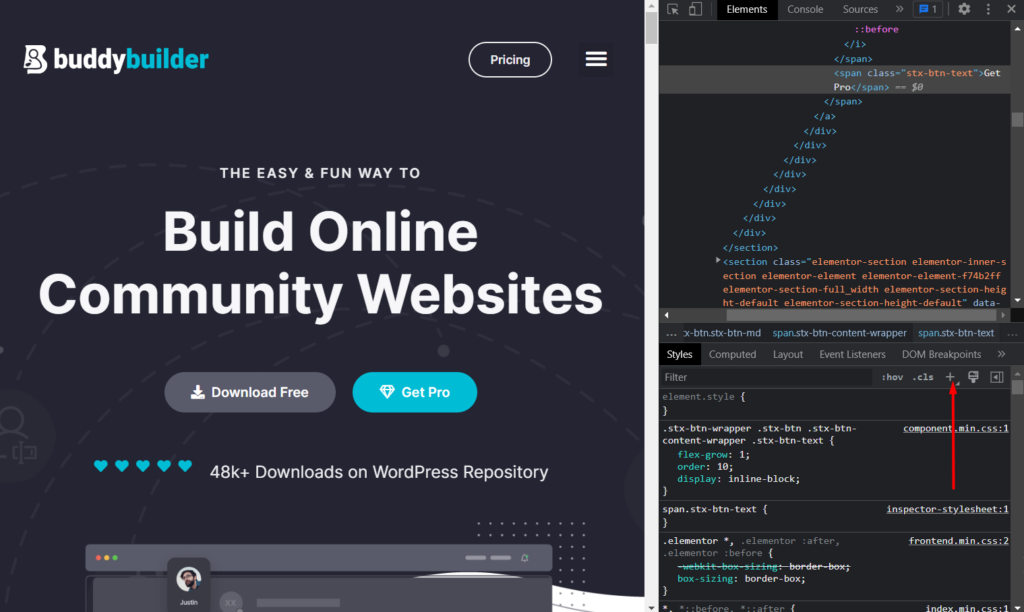
Upon clicking on it, an inspector stylesheet will be rendered. In this case, a CSS class to the button will be generated as illustrated below.
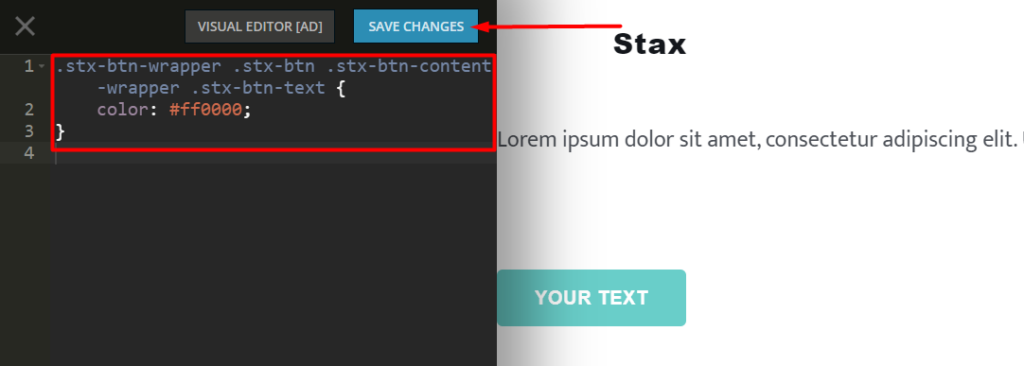
Our actual code in this case will hence be:
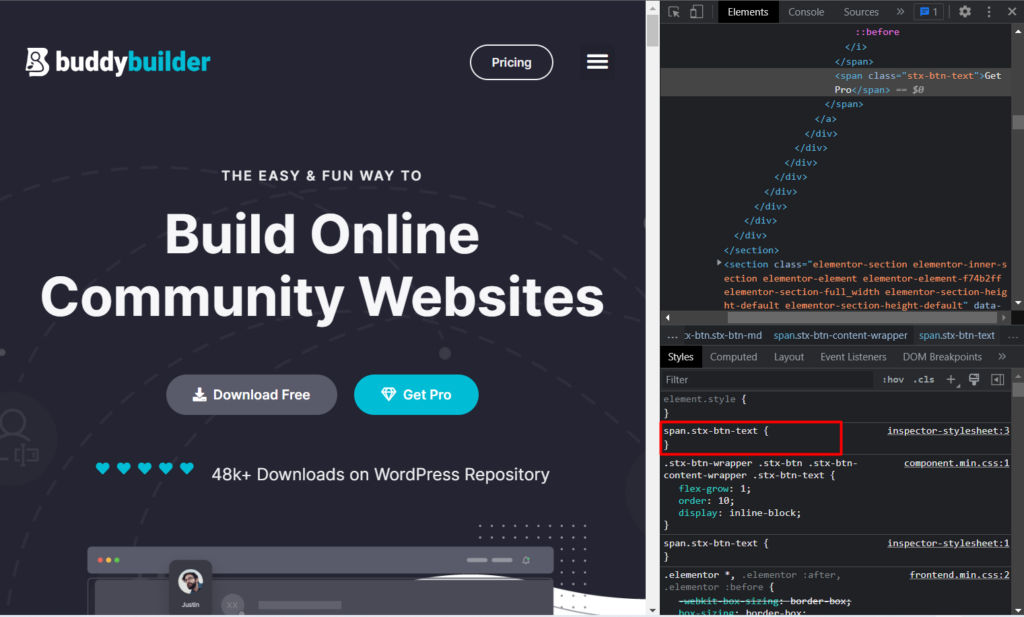
.stx-btn-text {}Now, to alter the color to the button texts, we will need to add the color code. For this, we will use the color property, specify a color to it and add it to our original code. This will be:
color: #ff0000;In the above case, #ff0000 is the color code that we intend to use. You can set any other color code of your preference.
Our final code will now be:
.stx-btn-text { color: #ff0000;}2. Alternatively, upon inspecting an element, you can use the first code to the element rendered or else the code used to style the element, for styling purpose. Below is an illustration to this code:
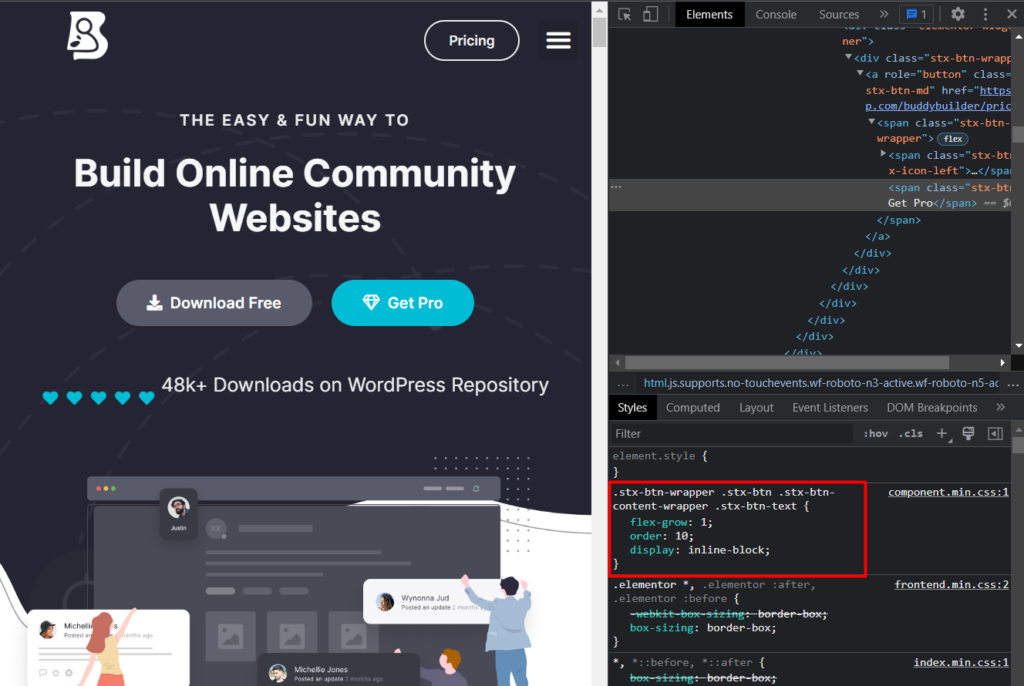
Within the code, add the color property and color code to it, as well as remove the other properties specified in it since in our case here we don’t need to overwrite them:
color: #ff0000;The final code will now read as:
.stx-btn-wrapper .stx-btn .stx-btn-content-wrapper .stx-btn-text { color: #ff0000;}Either of the above approaches can be used in identifying and determining the CSS to customize or add.
Upon specifying the code, you may notice that the color change takes effect, but this is not until the page is refreshed. We therefore need to save the CSS so that the CSS always takes effect. This now takes us to our next step.
How To Add Custom CSS
Now that we have looked into how to identify and come up with Custom CSS. We now need a way to add and save the CSS within our website.
There are various approaches that we can use to add custom CSS to our website. These include:
- Via a Child Theme
- Via the WordPress Customizer
- Using a Third-Party Plugin
Via a Child Theme
A child theme enables you to customize your parent theme thereby eliminating the likelihood of losing your customizations during theme updates. For more details on child themes and how to setup them you can check out the Child Themes topic here: Child Themes .
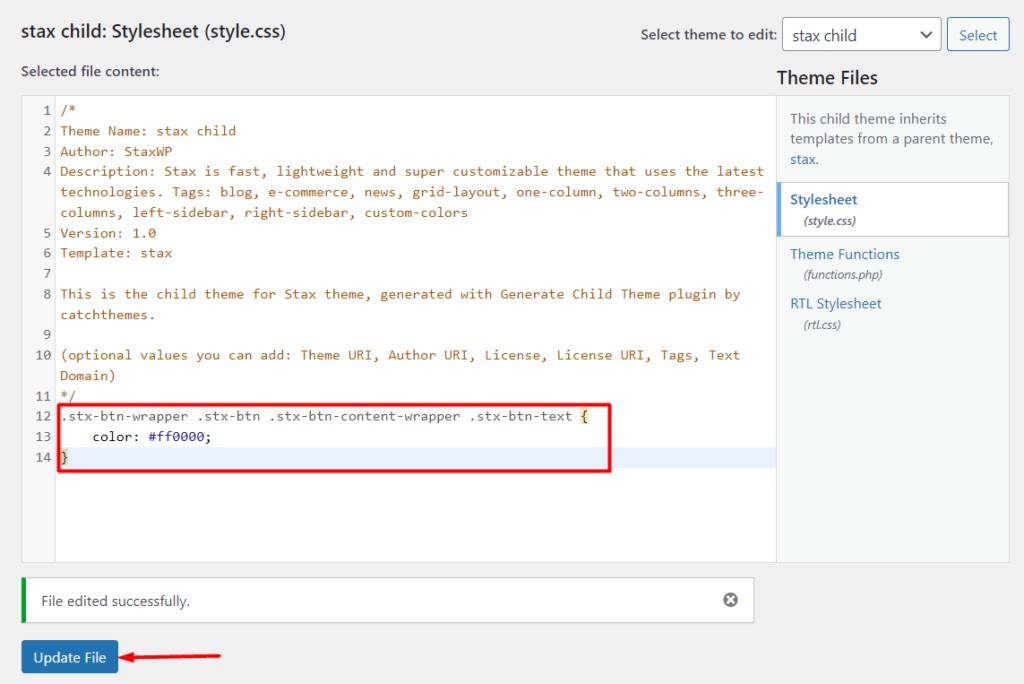
A child theme contains a style.css file. This is the file where you can add your custom CSS. To access it, this can be achieved by accessing your site files via FTP using an FTP software such as Filezilla. Alternatively, you can access it from the Appearance >Theme File Editor and select your child theme from the themes dropdown, as illustrated below:

Upon identifying the style.css file, add your custom code to the last line within the file and save your changes. In our case here, we will add the code in line 12 as illustrated below:
Via the WordPress Customizer
Addition of custom CSS via the WordPress Customizer is another great option to consider. In this method, you will need to:
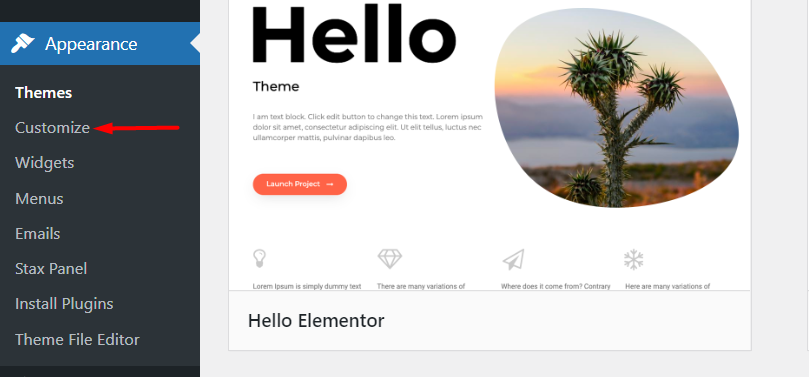
Navigate to the Appearance > Customize section within your WordPress dashboard.
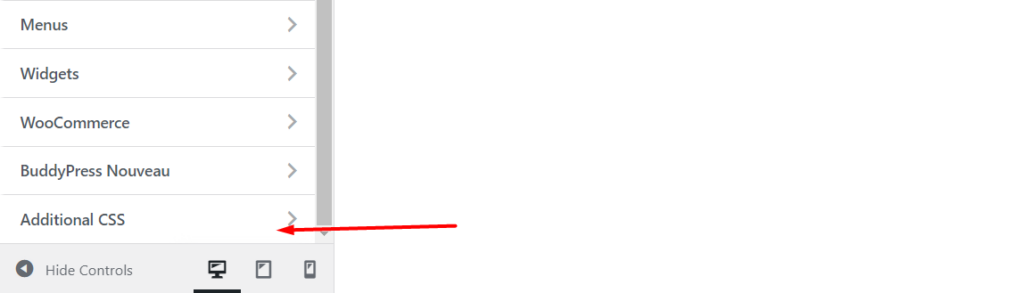
On the next screen, a number of options such as menus, widgets and many more depending on your theme will be rendered on the left panel. Scroll down till you find the “Additional CSS” option.
Upon clicking on the “Additional CSS” section, you will have a code input section where you can add your custom CSS. Now add your custom CSS to the section:
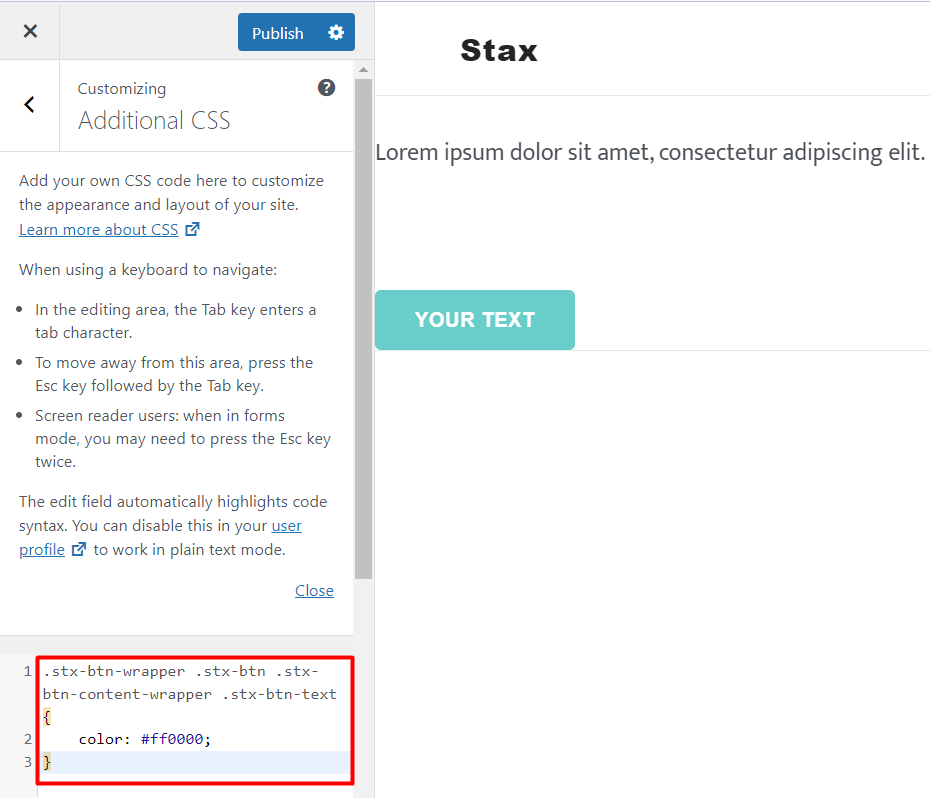
Upon adding your CSS code, you can save it as draft for publishing at a later stage or publish it straight away.
It is also important to note that this section provides validation and code syntax highlighting. If hence there are any errors in your code, upon adding it, you will have some highlighting on this.
Using A Third-Party Plugin
Addition of custom CSS with the help of a plugin is another consideration. This is actually more applicable if you happen to switch themes later on and you want the CSS you added used within the new theme as well.
There are a number of third-party plugins out there that can be used in the addition of custom CSS within your WordPress site. Here we will cover at least three of these plugins, and you can choose to use either of them within your website.
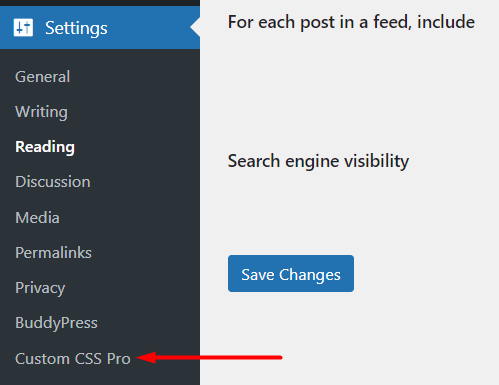
Custom CSS Pro

The Custom CSS Pro plugin provides an easy to use interface with a live editing experience for users who need to add custom CSS within their websites.
Upon the plugin installation, you can proceed to adding your custom CSS by accessing the Settings > Custom CSS Pro section within your WordPress dashboard.
Within the live editor provided, you can add your custom CSS and save your changes. Below is a sample on this:
SiteOrigin CSS
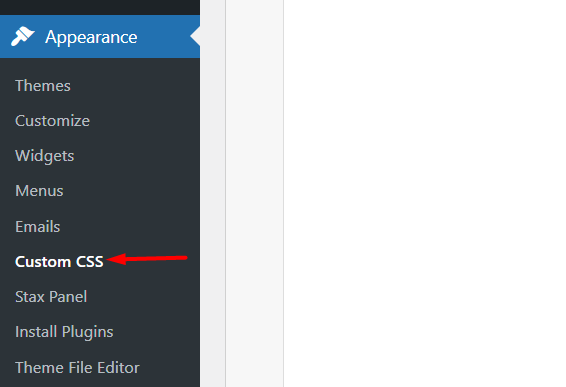
The SiteOrigin CSS plugin provides strong CSS editing capabilities. A key addition to the plugin is that it enables you to identify a selector that you can use to apply custom CSS to an element.
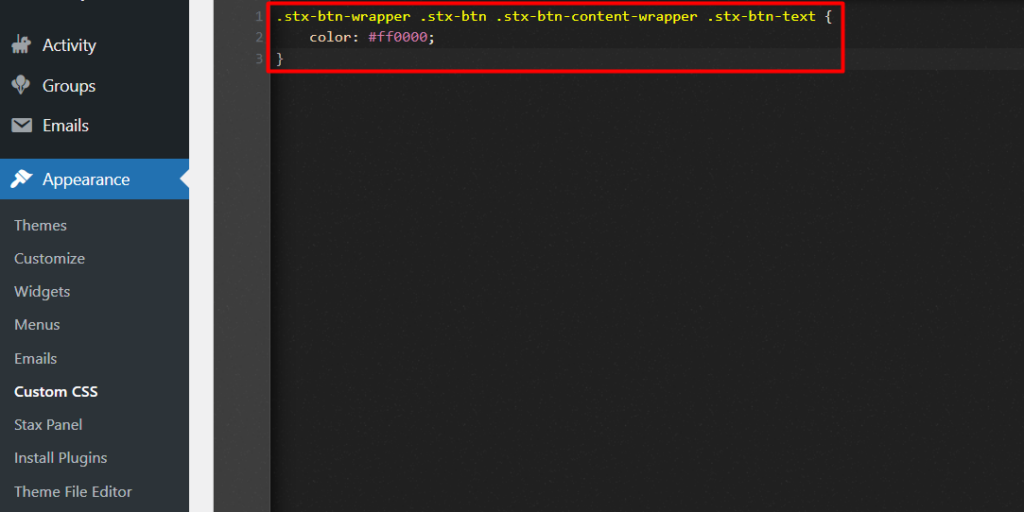
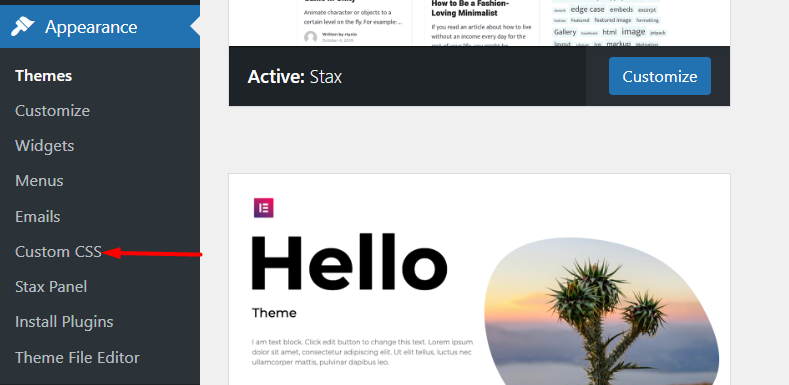
Once you have the plugin installed and activated, you will need to navigate to the Appearance > Custom CSS section as illustrated below:
Next, add your custom CSS within the Custom CSS editor rendered as seen below:
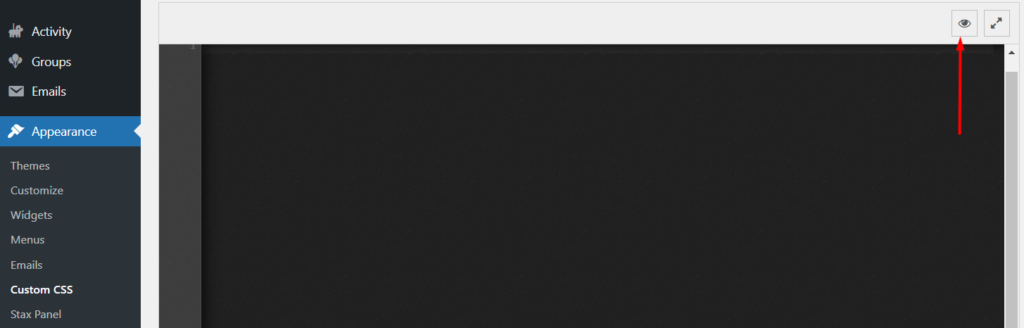
If you also wish to use the visual editor, you will need to click on the eye icon highlighted below:
Simple Custom CSS

The Simple Custom CSS plugin is a lightweight and easy to use plugin that enables website administrators to add Custom CSS to their websites.
Upon installing the plugin, you will need to navigate to the Appearance > Custom CSS section.
Next, within the editor rendered, add your custom CSS. Below is a sample illustration on this:
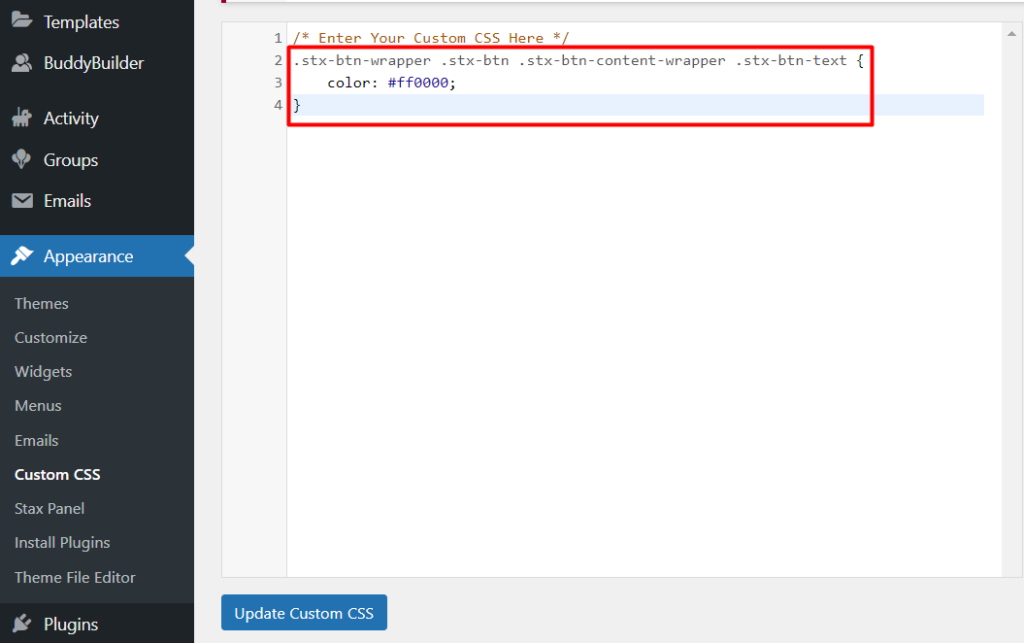
Once this is done, save your changes by clicking on the “Update Custom CSS” button.
Common Reasons Why CSS Changes Do Not Take Effect
In some cases, the custom CSS that you add within your website may not always take effect. This can be caused by a number of reasons, among them being:
1.Caching
If you have a caching plugin installed, this may result to caching of various assets in your site. It is hence vital that you clear the site caching after saving your custom CSS or disable the caching plugin that you could be using.
At times you may also have caching at a server level if your hosting provider provides support for server caching. In such instances it is important to have your host disable caching for you or have this carried out from your hosting panel if an option for this is provided.
2. Syntax Errors
A CSS syntax error is generally a mistake in your CSS code. It could for example be a missing colon, semi-colon, or an even an incorrect property spelling.
It is important to check that your CSS code does not have such errors. You can use a CSS validator such as the CSS Validation Service to carry out the CSS validation.
3. CSS Specificity
CSS Specificity basically determines which CSS takes precedence if you have CSS rules targeting the same element.
Let’s say for example in our case if we had two CSS codes to alter the color of the buttons, where one of the codes uses an ID to specify the styling and the other uses a class.
#stx-btn-text { color: #000000;}.stx-btn-wrapper .stx-btn .stx-btn-content-wrapper .stx-btn-text { color: #ff0000;}The CSS code with the ID selector is what will be used. This is due to the fact that ID selectors have a higher specificity than classes. In the case above the color that would be applied would be black (#000000).
You can however use the !important rule after the property value in order to override the CSS specificity. For example, in our case here, if we apply the !important rule to the code with a class, then that CSS code is what will be applied and in such a case the color would be red (#ff0000).
.stx-btn-wrapper .stx-btn .stx-btn-content-wrapper .stx-btn-text { color: #ff0000 !important;}The !important rule should however be sparingly used (only when really needed). One of the reasons to this is because if the rule is applied on an element in multiple instances, it may cause confusion when applying styles, and may turn out quite difficult to debug the issue.
Conclusion
Understanding how to identify and add custom CSS within your WordPress site can be quite helpful to site owners. One of the advantages in this is in reducing the time taken to design your site. In addition, it also helps in eliminating the need to outsource a developer for minor CSS customizations.
We do hope that this guide was informative when it comes to adding custom CSS. You can learn more on CSS here . Should you have any suggestions, questions or comments, feel free to raise them in the comments section down below.