How To Secure Your WordPress Admin (Wp-Admin)
Table of contents
WordPress security is quite vital in the WordPress ecosystem. One of the security approaches to take is to secure your Wp-admin. This is because the Wp-admin is likely to be the first point that attackers will use to try and gain access to your site.
By default WordPress administration files are stored within the Wp-admin folder. Despite WordPress having various security measures in place to protect the folder, the fact that the default WordPress admin is widely known, then this makes it an easy target for hackers. It is hence important to reduce the risk of web attacks triggered from the WordPress admin.
Within this article, we will look into some of the approaches that you can utilize in order to secure your WordPress admin.
Approaches to Securing your Wp-admin
There are various ways that you can utilize in order to secure the WordPress admin area. Below is a quick list on these security practices.
1. Avoid using the default “admin” Username
On a fresh WordPress install, the first account created is the administrator account. “admin” is set as the default username in such an install. This is actually public knowledge.
One way a hacker can easily figure out if “admin” is your username is simply by accessing your site login URL and trying out the “admin” username. If “admin” is actually a username within the site, they will have such an error message within the login screen; “Error: The password you entered for the username admin is incorrect. Lost your password?”
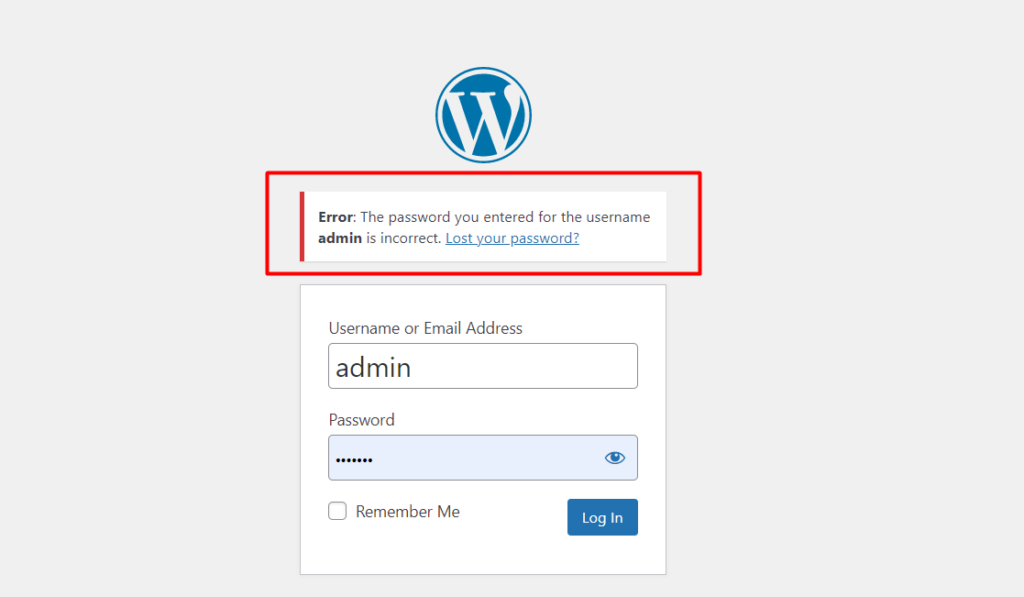
Such an error message would serve as a confirmation to the hacker that there exists a username “admin” within the site.
At this stage a hacker already has two pieces of information in regards to your site. These are the username and login URL. All that the hacker needs is the password to the site.
A hacker will at this point now try carrying out attacks by simply running passwords against that username in order to gain access to the site. This can be carried out manually or even via bots.
Another approach a hacker can use is by simply appending the query “?author=1/” to the URL so that it reads as yourdomain/?author=1/. If you have a username with the user admin, then the URL will return posts from the user or none if there are no posts associated with it. Below is a sample illustration:
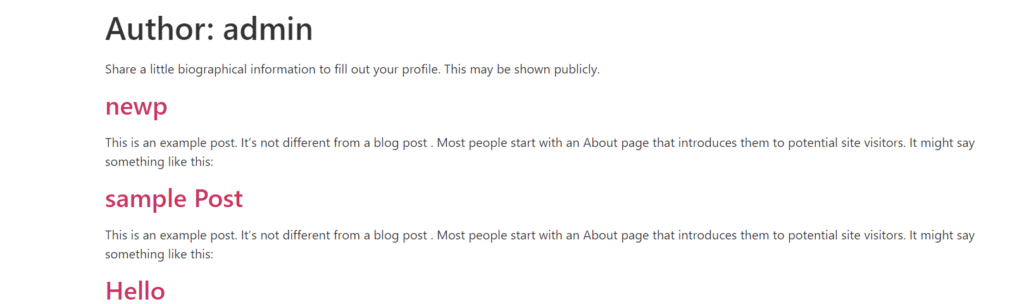
In either of the cases, as long as a 404 error is not returned, this would serve as a confirmation that there surely exists a username with the “admin” username.
Based on the above scenarios, if you have the default username “admin” in place, it is vital that you create a new administrator account from the Users > Add New section within your WordPress dashboard.
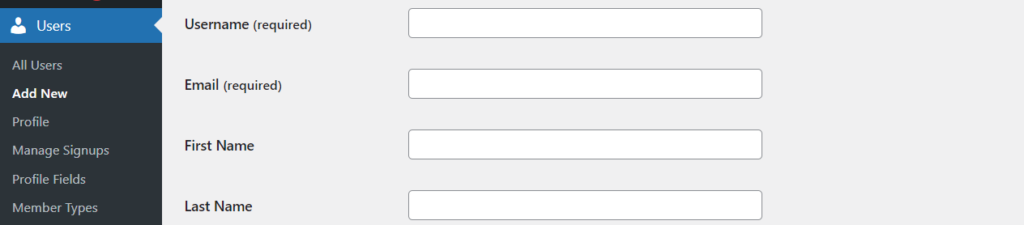
Once this is done, ensure that you delete the previous “admin” account.
2. Creating Strong Passwords
Strong passwords are essential to any WordPress site out there. Weak Passwords on the other hand make it easy for hackers to gain access to your WordPress site.
Some of the password security measures that you can incorporate include:
- Ensure that the password is long enough (a minimum of 10 characters)
- The password should at least contain alphanumeric characters, spaces and special characters
- Ensure passwords are regularly changed or updated
- Make sure that you do not reuse passwords
- Passwords should not be dictionary words
- Store passwords using a Password manager
- Ensure that users registering to the site fill in strong passwords
Passwords should also not be guessable as this would again pose a security threat.
3. Password-Protect the Wp-admin area
WordPress does offer a security level to the Wp-admin by allowing users to fill in their username and password in order to login. However, this may not be enough since hackers can actually carry out web attacks upon accessing the Wp-admin. It is hence recommendable to add an extra layer of security to the Wp-admin. This can be carried out either via:
i) cPanel
ii) .htaccess
Via cPanel
In order to password-protect the Wp-admin via cPanel, you will need to carry out the following:
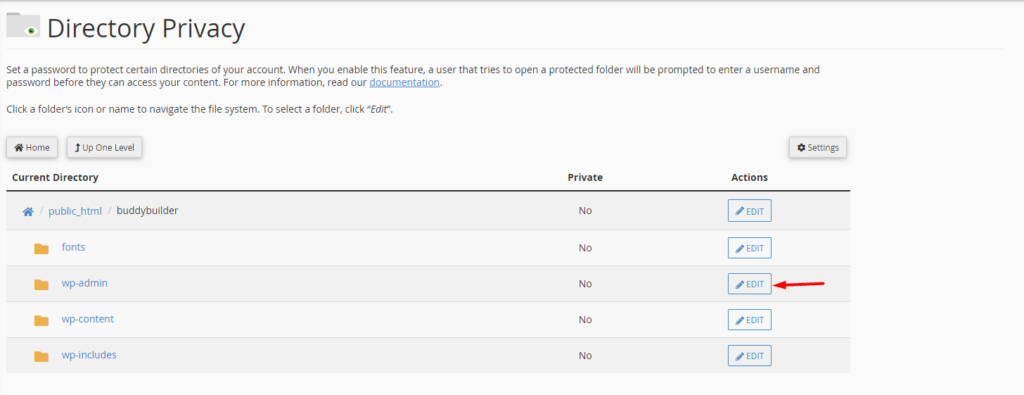
First access your cPanel dashboard and click on the “Directory Privacy”.

Next, access the public_html folder.

Within it, click on the “Edit” button within the wp-admin directory.
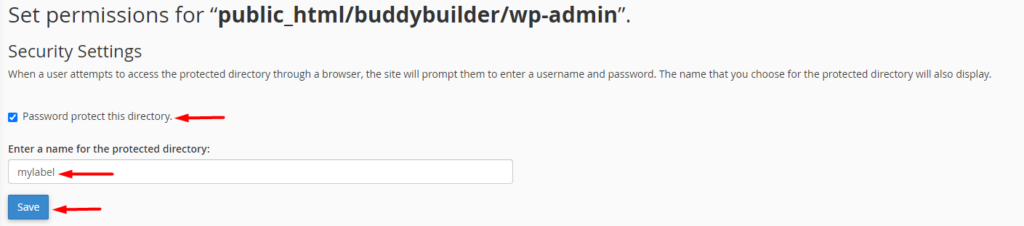
On the next screen, enable the option “Password protect this directory” and within the “Enter a name for the protected directory” field, fill in a name of your preference and save your changes.
Once this is done, take a step back and create a new user with your desired details (username and password).
With the above carried out, if a user tries to access the wp-admin folder, he will be required to fill in the newly created username and password prior to being redirected to the screen where he will need to fill in his or her WordPress admin credentials.
Via .htaccess
The .htaccess is a configuration file used by Apache serves to make changes on directories. You can learn more about the file within this article.
In this section, we will look into how to use the .htaccess file to restrict the wp-admin folder. To do so, we will need to create two files (.htaccess and .htpasswd) by carrying out the following:
i) Create a .htaccess file
Using a text editor of your preference, create a new file named .htaccess.
Add the following contents to the file:
AuthType basicAuthName "Protected directory"AuthUserFile /home/user/public_html/mydomain.com/wp-admin/.htpasswdAuthGroupFile /dev/nullrequire user usernamedetailIn the above code, you will need to alter the “AuthUserFile” path specified (/home/user/public_html/mydomain.com/wp-admin/) with your wp-admin directory path which is where you will upload the .htpasswd file. In addition, you will also need to alter the “usernamedetail” within the line “require user”, with your desired username.
ii) Create a .htpasswd file
Still using a text editor of your preference, create a new file named .htpasswd.
Access the web2generators.com generator.
Fill in your username and password in the dedicated fields within the Htpasswd Form and click on the “Generate” button.
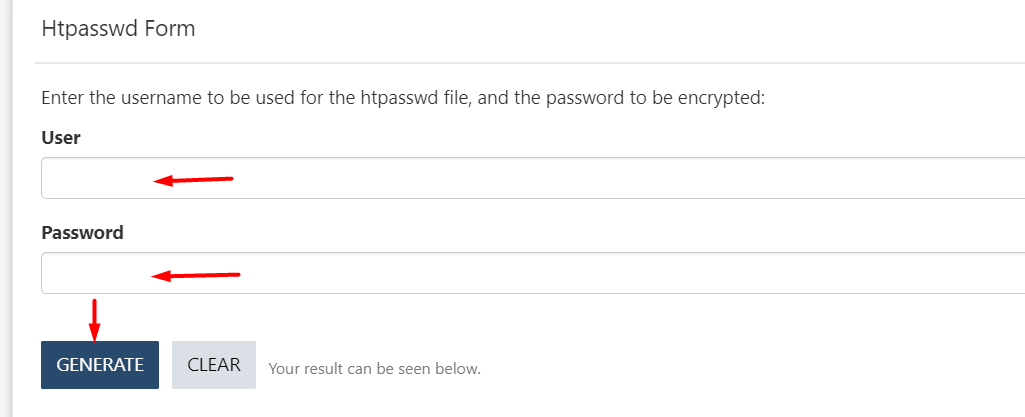
Once done, copy the result to your .htpasswd file and save your changes.
iii) Upload the files via FTP
In order to upload the files via FTP, you will need to use a tool such as Filezilla.
To begin with, you will need to upload your .htaccess file to the wp-admin directory of your site followed by the .htpasswd file.
Once a user now tries to access the /wp-admin, he will be presented with a login screen similar to what is seen below:

4. Create a Custom Login URL
WordPress login URLs are accessed by either appending the wp-admin or wp-login.php? to your domain. The fact these are the default WordPress login end-points means that as long as a hacker has access to the domain, he can easily access your login URL.
If you also happen to using the default “admin” username, then that would again mean that a hacker would only need to figure out one piece of information, which is the “password”.
It is hence important to have in place a custom login URL for your site. One way to achieve this is that you will need to install the WPS Hide Login plugin.
Upon installing the plugin, navigate to the Settings > WPS Hide Login section and specify your desired login URL and a redirect URL which will be accessed when a non-logged in user tries to access the Wp-login.php or Wp-admin .
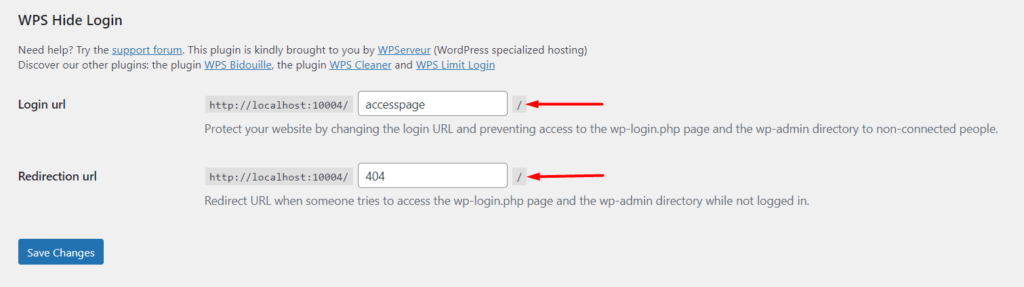
Once this is done, save your changes.
This will make it hard for anyone trying to access your website login, thereby reducing potential tasks.
5. Incorporate a Two-Factor Authentication/Verification
Two Factor authentication is a security mechanism whereby an extra layer of security is provided by adding an extra authentication requirement.
In order to implement Two Factor Authentication within your WordPress site, you can use a third-party plugin of your preference. In this guide, we suggest using the WP 2FA – Two-factor authentication for WordPress plugin due to its ease of use.
To utilize the plugin, navigate to the Plugins > Add New section within the WordPress dashboard and search for WP 2FA.
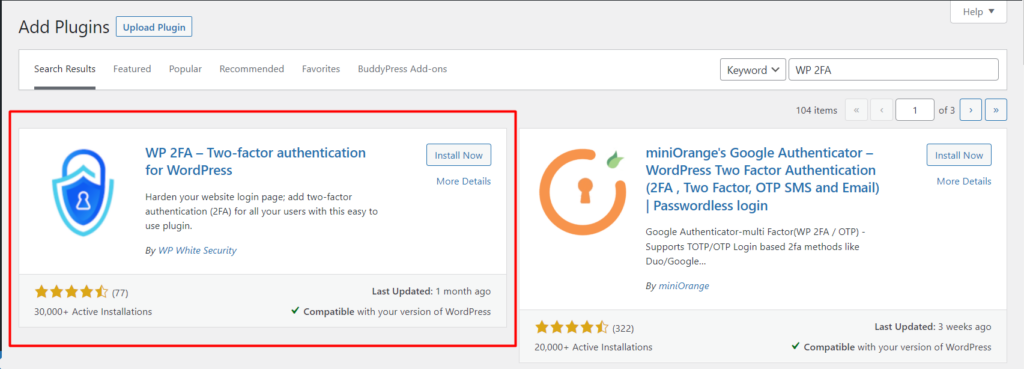
Install and activate the plugin.
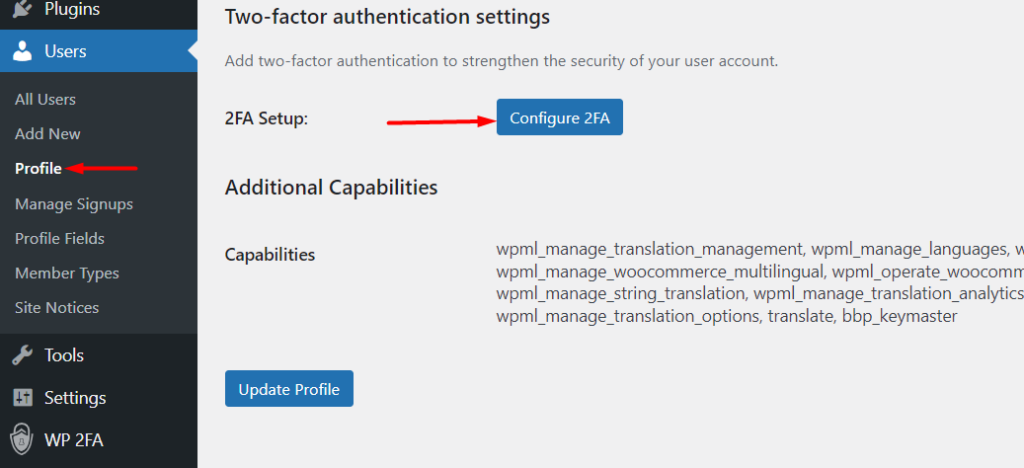
Once this is done, navigate to the Users > Profile section and click on the “Configure 2FA” button.
On the next screen, select your desired 2FA method. In our case here, we will select the option “One-time code generated with your app of choice”.
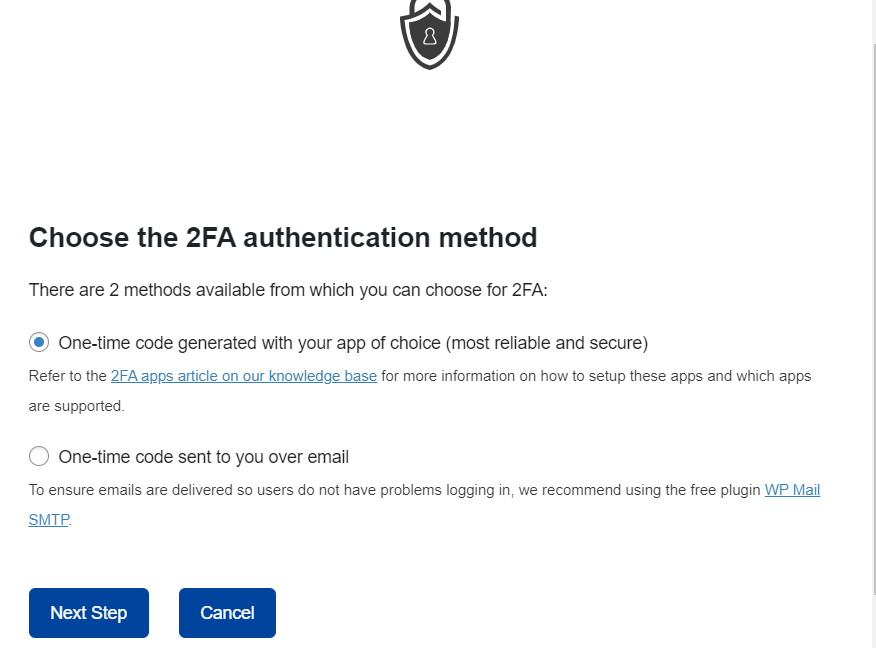
Upon the selection, proceed to the next step. Here, select your desired app for authentication form the icon list provided. Clicking on an icon will redirect to the guide on how to setup the application.
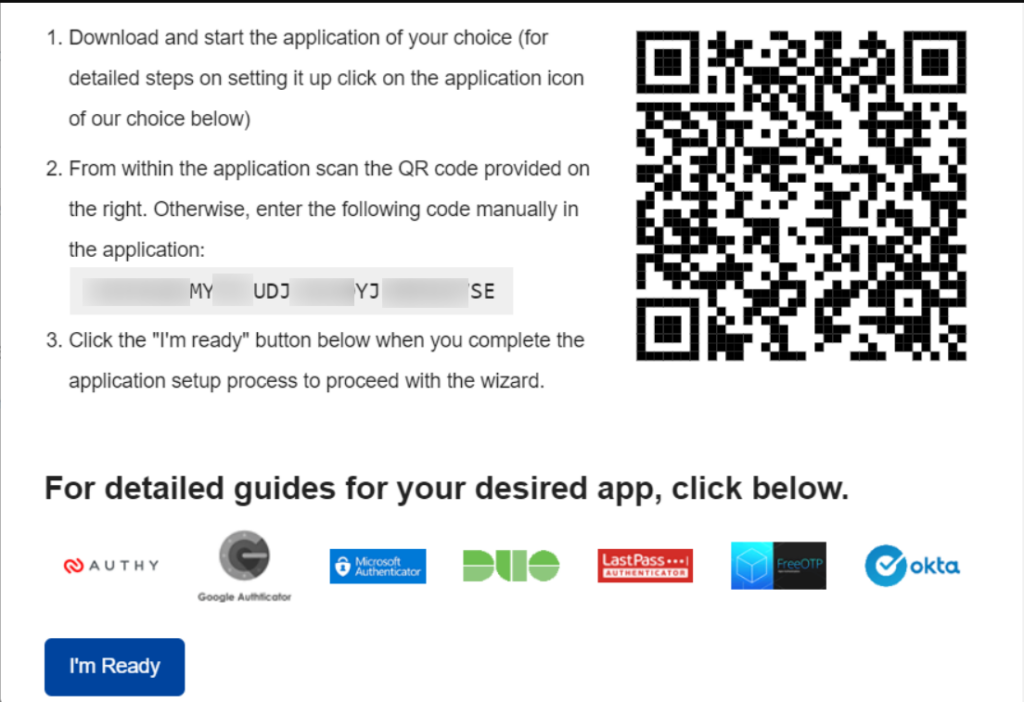
In our case here, we will use the “Google Authenticator” app. You can hence first begin by first installing the Google Authenticator app on your desired device such as on mobile.
Once this is done, open the app and tap on the floating “+” icon on the bottom right region on the app.
Next, you will be required to scan the QR code within the screenshot illustrated above.
Upon doing so, you will be redirected to a screen with the newly added account, alongside the 2FA code.
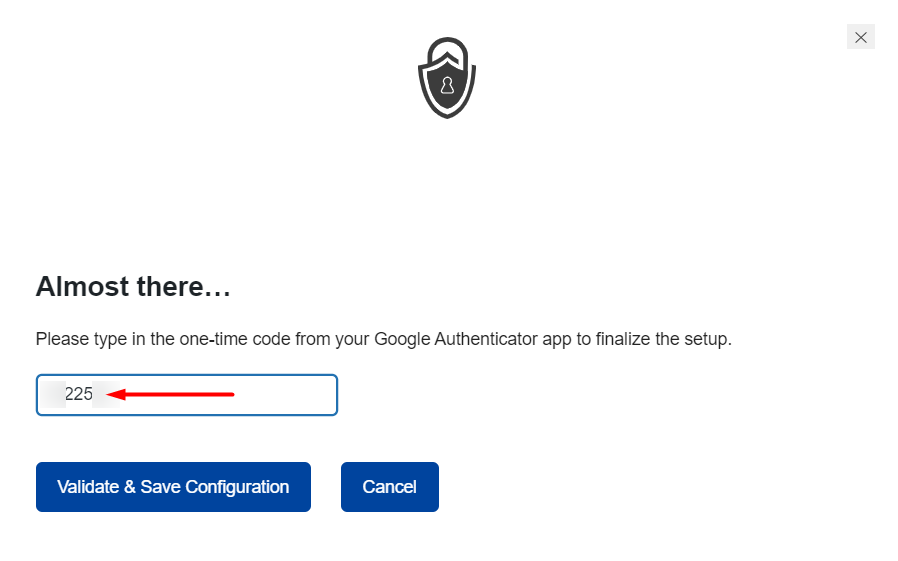
Next, head back to your site and fill in your 2FA code, validate and save the configuration. Below is a sample illustration:
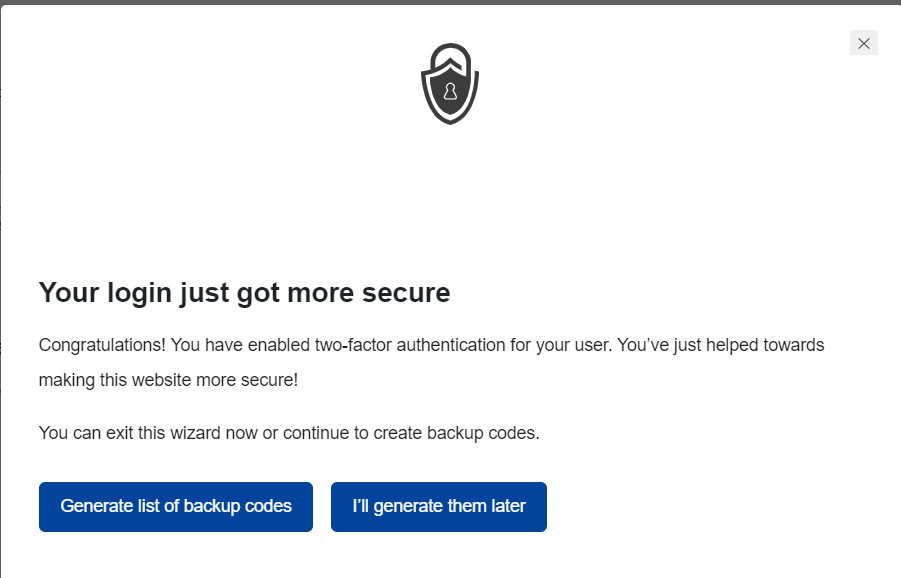
Once this is done, you will now have a success message and you can then carry out a backup to your codes.
For detailed illustrations on how to go about this, you can check out the guide here.
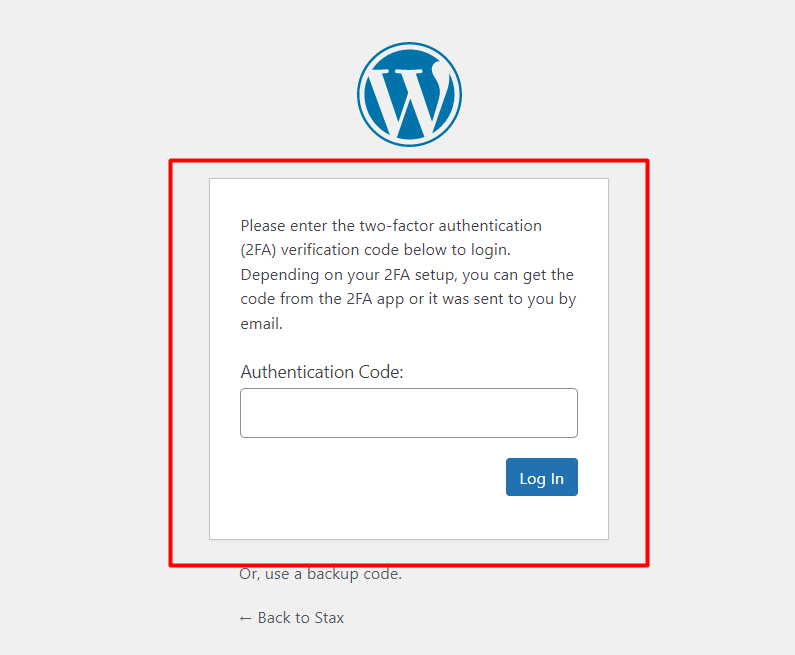
Once a user now tries to login to the site, even by by-passing the first login, he will be presented with an extra authentication layer where he or she will be required to fill in the authentication code.
6. Enable auto logouts
After logging in to a website and users do not close their browser window, the sessions are not terminated for quite some time. This makes such a website prone to hackers via cookie hijacking. This is a technique whereby a hacker is in a position to compromise a session by stealing or accessing cookies within the a users’ browser.
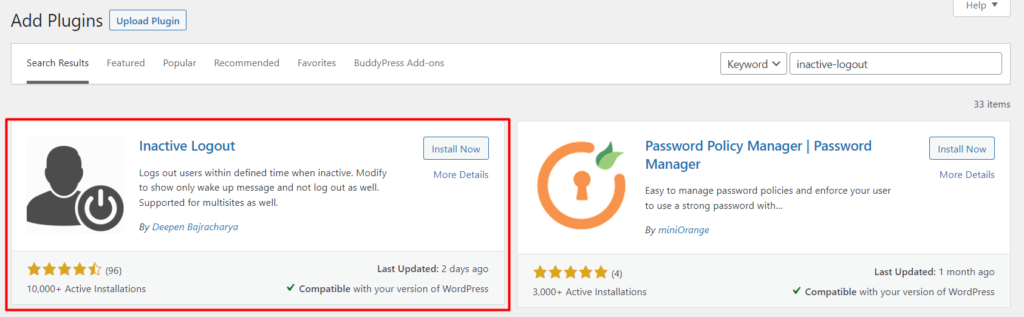
As a security mechanism, it is hence important to automatically logout idle users within the website. To achieve this, you can use a plugin such as the Inactive Logout plugin.
The plugin can be installed from the Plugins > Add New section by first searching it, installing it and having it activated.
Upon activation of the plugin, navigate to the Settings > Inactive Logout section, set the “Idle Timeout” and save your changes.
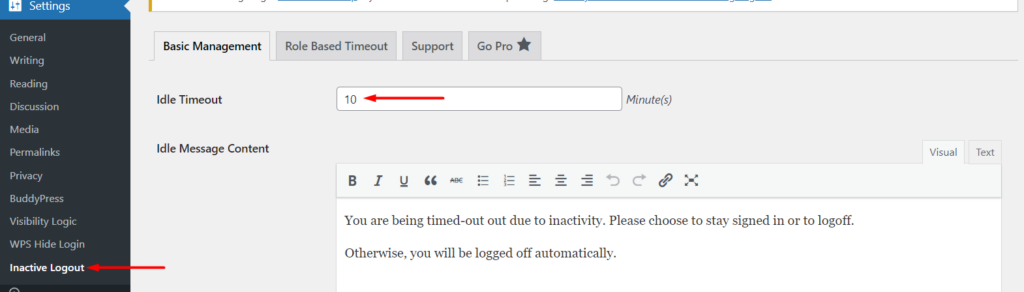
You can have the value set to any of your preference, but 5 minutes would be ideal.
7. Limit the number of Login attempts
By default WordPress does not offer a limit to the number of login attempts within a website. This makes it possible for hackers to run scripts that contain common user login details to try and penetrate the website. If the number of attempts are way too many, they may cause an overload on your server and eventually there is likely a downtime on the website. In a case where you are using common login data, a hacker is also likely to successfully access the site.
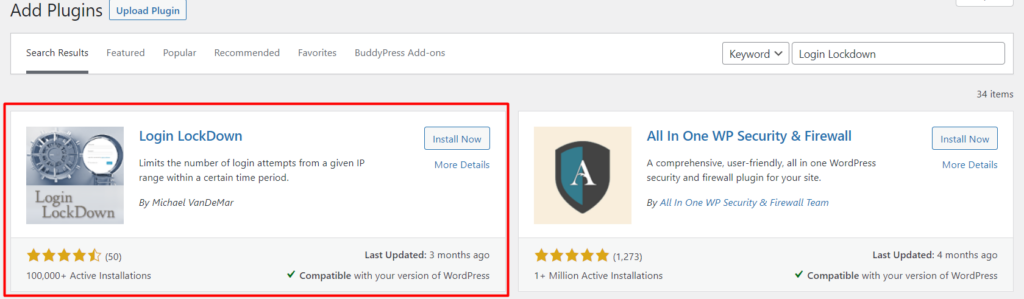
It is hence important to limit the number of login attempts within a website. For this implementation, you can use a plugin such as Login Lockdown.
Similar to other plugin installations in wordpress.org, you can install the Login Lockdown plugin from the Plugins > Add New section. Within the section, search the plugin, install and activate it.
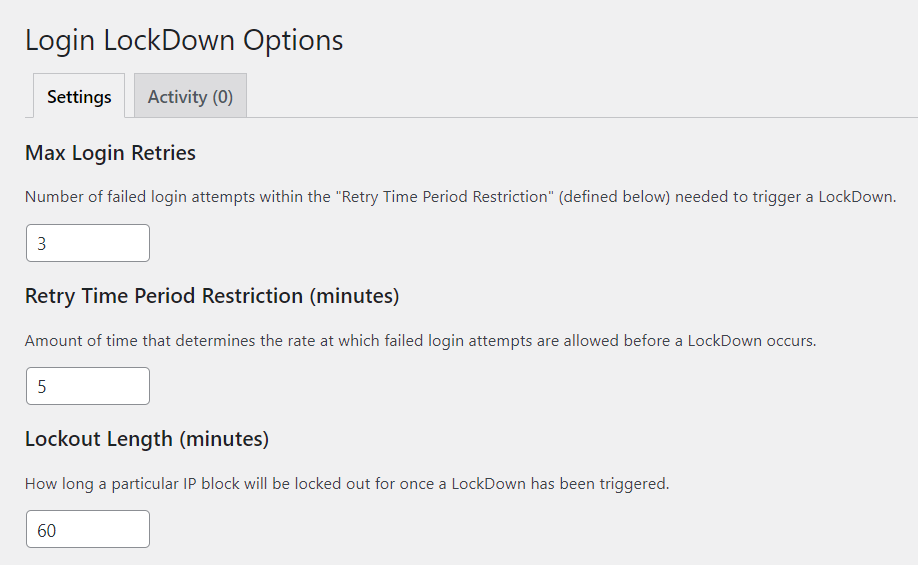
Upon activation, navigate to the Settings > Login Lockdown and specify your desired lockdown settings such as the Max Login Retries, Retry Time Period Restriction, Lockout length and many more based on your preference.
8. Implement IP restriction
IP restriction is an approach that you can also implement in order to deny access to the Wp-admin. This method is however recommendable if you are using a static IP.
In order to implement the IP restriction, you will need to create a .htaccess file within the wp-admin directory if you don’t have one already, and add the following code to the file:
AuthUserFile / dev / nullAuthGroupFile / dev / nullAuthName "WordPress Admin Access Control"AuthType Basic<LIMIT GET>order deny, allowdeny from all# Allow First IPallow from xx.xx.xx.xxx# Allow Second IPallow from xx.xx.xx.xxx# Allow Third IPallow from xx.xx.xx.xxx</LIMIT>Once done, you will need to replace the xx.xx.xx.xxx within the code with the IP addresses that you wish to grant access.
If you also happen to change your network, you will need to access your site files and add the new IP in order to be in a position to login to the site.
If now a user whose IP is not allowed to access the wp-admin tries to access it, he will encounter a Forbidden error message similar to the illustration below.

9. Disable Errors on the Login page
WordPress by default will render errors on the login page if a user tries to login into the site using incorrect credentials. Some examples of these error messages are:
- “ERROR: Invalid username. Lost your password?“
- “ERROR: Incorrect password. Lost your password?“
With such messages being rendered, they are actually providing hints on the incorrect login detail and that would mean that a hacker would be left with only one detail to figure out. For example the second message is a hint that the password is what is incorrect. The hacker would therefore only need to figure out the password to gain access to the site.
In order to disable these error messages, you will need to add the following code within the functions.php file in the theme:
function disable_error_hints(){ return ' ';}add_filter( 'login_errors', 'disable_error_hints' );If a user now tries to login to the site with incorrect credentials, there will be no error message displayed. Below is a sample illustration on this:
10. Using a Security Plugin
WordPress security plugins hep in reducing security threats within your website. Some of these security plugins offer features such as addition of reCaptcha, IP restricton and many more.
It is hence important that you consider using a security plugin to reduce the likelihood of attacks within the Wp-admin. Some sample security plugins that you can consider using are: WordFence and Malcare.
11. Update WordPress to the latest version
WordPress is a regularly updated Software. Some of the updates do incorporate security fixes. If for example there was a security release targeting the Wp-admin, and in your case you fail to update your WordPress version, then that would mean that your Wp-admin is prone to attacks.
It is hence important to regularly update your WordPress version to reduce the risk of exploits on your website.
Conclusion
The WordPress admin is a major target by hackers in order for them to gain full control of your website. It is hence important for you to protect the WordPress admin section of your website.
Within this article, we have looked into a number of ways that you can use in order to secure your WordPress admin. We hope that the article is informative and helpful. Should you have any questions or suggestions, please feel free to utilize the comments section down below.