With the help of the Visibility Logic and Elementor plugins, you can actually hide or show content based on Geolocation on any WordPress site. Visibility settings can be applied to elements, sections and containers. As an example, you can hide a banner or text within your site from site visitors in a specific country or city.
Within this article, we will look into how to determine content visibility based on Geolocation, broken down into three core steps. We will use an example meant to display some text if a user is within the set location.
Table Of Contents
Steps to determine content visibility based on Geolocation
Testing Content Visibility based on Geolocation
Steps to determine content visibility based on Geolocation
Setting up content visibility involves the following core steps outlined below:
- Adding Your MaxMind API Details
- Setting Hide Or Show Actions
- Setting Geolocation Visibility Settings
Adding Your MaxMind API Details
The Visibility Logic For Elementor plugin relies on the MaxMind API for the location detection of a user. In order for the location feature to therefore properly work, you will need to fill in your MaxMind API details within the Visibility Logic plugin settings. To begin with, you will need to carry out the following:
1. Create a MaxMind account and generate a license key to it. For a clear procedure on how to go about this, you can check out our guide below:
How To Create A Maxmind Account And Generate A License Key .
2. Next, navigate to the Settings > Visibility Logic > Settings tab
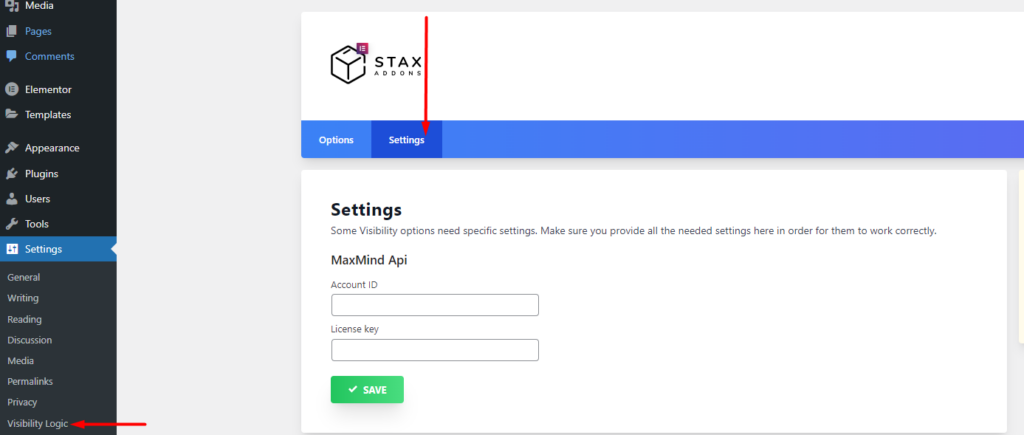
3. Within the MaxMind API section, fill in your MaxMind Account ID and License Key.
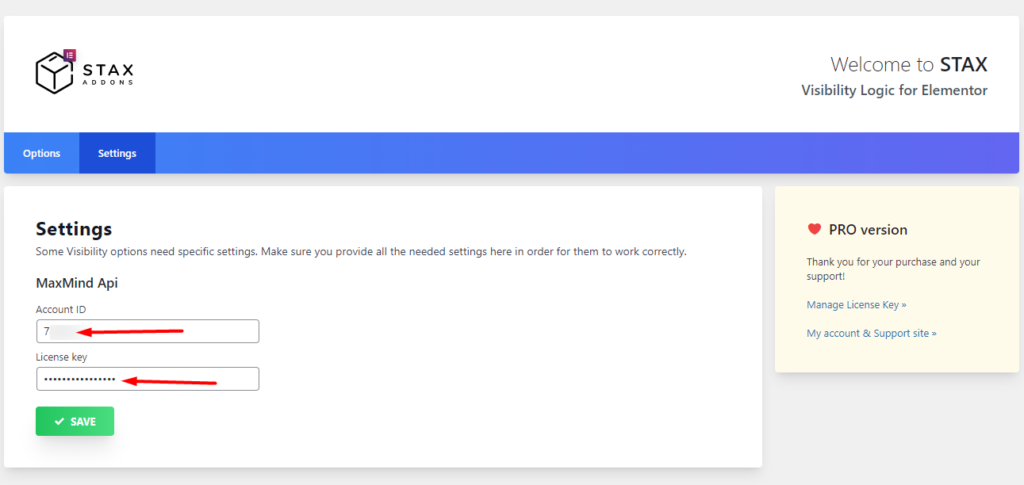
4. Save your changes
Setting Hide Or Show Actions
Visibility settings can be applied to various types of content within your website. You will first need to edit your page or post via Elementor and select the content you wish to hide or display.

Next, click on the “Stax Visibility” tab
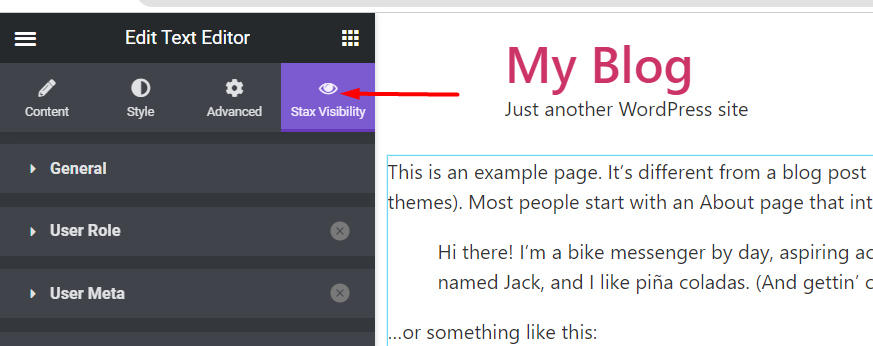
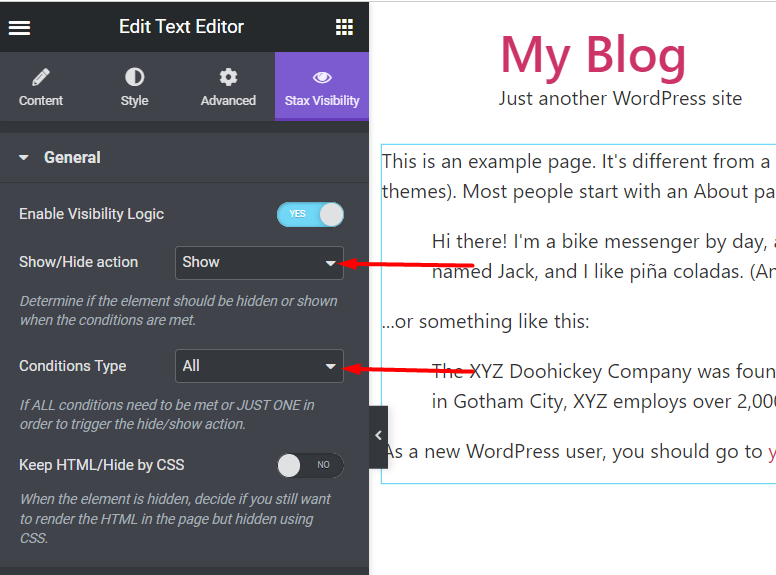
Upon clicking on the tab, click on the “General” pane and turn on the option “Enable Visibility Logic” . Once this is done, set a hide or show action based on your preference as well as a condition type. In our case here, we will set a “show” action to be displayed if all specified conditions are met. Below is a sample screenshot on this:
Setting Geolocation Visibility Settings
Within your element or section, you can then specify visibility based on Geolocation from the “Geolocation” tab.

Upon clicking on the “Geo Location” pane, enable Geolocation from the toggle option provided.
The next step would involve setting the location type. This can either be set to country or city based on your preference.

Upon doing so, select a city or country where you would like the Geolocation settings applied based on the selection you made for the Location Type field. You will need to at least type a few characters of your city or country in order for the selection to be rendered from the list of cities or countries.
Below are some screenshot illustrations upon selection:
City selection

Country Selection

Testing Content Visibility based on Geolocation
Once the above steps are carried out, ensure that you update your changes and then test whether they are reflected on the frontend by previewing the page or post.
In our case here, as intended, the text is not rendered since the set location is not where the test is being carried out as seen in the screenshot below:

The text will however be visible if a user visits the page from the set location.
Conclusion
Implementing visibility settings based on Geolocation shouldn’t be a hard nut to crack. With the help of the Visibility Logic plugin, you can actually setup visibility based on Geolocation. It is however worth noting that the Visibility Logic plugin is applicable to Elementor-based content.
We hope that this article serves as a guide on how to enable content visibility based on Geolocation. Should you have any suggestions, questions or comments, please feel free to raise it within the comments section down below.


No Comments
Leave a comment Cancel