How To Use And Manage WordPress Transients
Table of contents
WordPress Transients may not be quite a common topic amongst novice WordPress users. However, in todays’ world, having a fast running website is precisely everyone’s desire. There are various ways to optimize the performance of your website. WordPress Transients may actually come in handy at times in such scenarios.
Within this article, we will look into what really WordPress Transients are, their importance as well as how to utilize and manage them within yoursite.
What Are WordPress Transients
Transients are a method to temporarily store cached data in the database with a custom name and an expiration timeframe. This is all made possible by the Transients API.
Once the stored data expires, it can no longer be accessed. It is hence important to ensure that you only use Transients for data that you expect will expire. Such data could for example be share counts on social widgets, number of followers on social media widgets used in a theme widget or plugin.
There are three components that make up a WordPress Transient. These include:
- $transient:- This is a unique String used in identifying your Transient. It can also be referred to as the Transient Name. The String should be less than 172 characters.
- $value:- This is the data being saved or retrieved by the API. The value can be an object, String, number or even an array.
- $expiration:- This is the time in seconds that a Transient is stored within the database before it is deleted. The time set is the maximum time a transient will be valid. It is however important to note that Transients may expire before the set expiration period for example in cases where there is a Database upgrade.
Transients are way similar to the WordPress Options API, with the core differentiating factor being that Transients have a defined lifespan after which the Transient will be removed from the Database whereas for the Options API, data is saved permanently to the database.
Importance of WordPress Transients In Your Site
A core importance of WordPress Transients is that they help in increasing the general performance of your website. This is especially the case where there are intensive database queries. As an example, if you have a high traffic website in place and there are multiple queries at a go, this may cause a server overload. This would in turn, lead to a poor performing website.
In the above example, WordPress Transients would come in handy in that they would cache such data so that once the data is requested again, it is readily available and doesn’t take long to fetch it. This heavily impacts your website performance in that slow running queries to your Database are eliminated.
Using Transients
There are various actions involved while utilizing Transients within your WordPress site. These include:
- Setting the Transient
- Fetching the Transient
- Deleting the Transient
The way you name your Transients is quite key as Transient names will be used as a major reference in the above actions. It is recommendable to have prefixing of your Transient in order to avoid conflicts.
Setting The Transient
Setting a WordPress Transient generally involves the creation of the Transient itself. In order to do so, you will need to add the function set_transient() in the format below:
set_transient( $transient, $value, $expiration );$transient: Represents the name of the Transient
$value: Represents the value of the Transient. This could for example be an object, array or a variable.
$expiration: This is the maximum amount of time in seconds that the transient data will be stored.
An example code to set a transient is:
$mytext = "This is a sample Transient Data";set_transient('myplugin_data', $mytext, 3600);In the above code we are creating a WordPress Transient named myplugin_data that holds a variable that represents text content for 3600 seconds which is equivalent to one hour. If you happen not to set the expiration time, then the Transient never gets to expire.
There is also another function set_site_transient() that also provides similar functionality to the set_transient(). The difference between the two being that Transients set using the function set_site_transient() are always loaded automatically.
The set_site_transient() uses the same parameters as set_transient(). Based on our example above, you can hence use the function as illustrated below:
$mytext = "This is a sample Transient Data";set_site_transient('myplugin_data', $mytext, 3600);Fetching The Transient
WordPress Transients are retrieved using the get_transient() function. If however you had used the set_site_transient() function, then you will need to use the get_site_transient() function to retrieve the Transient.
The get_transient() function holds only one parameter which is the name of the Transient. When the the function is utilized and the Transient does not exist or is expired, then the function returns false. It is hence important to first check whether the Transient exists within your code before making a call to return the Transient. Below is a sample code in our case here:
$transientvalue = get_transient('myplugin_data');if ($transient value == false){return;}echo '<p>' .$transientvalue. '</p>';Deleting A Transient
In cases where you would wish to delete an existing WordPress Transient before expiration, you can use the delete_transient() function. This function as well holds only one parameter which is the Transient name.
This functionality is especially useful in social sharing functionality. For example if the social platform transient expires within 24 hours and a post within the website has already garnered numerous shares, then the post will render an incorrect number of shares that is within the previous 24 hours. Deleting such a Transient helps in ensuring that the correct number of shares within the post is rendered.
Below is a sample code to delete our Transient:
delete_transient('myplugin_data');Managing Transients
One of the most appropriate ways to manage Transients within your WordPress site is by using the Transients Manager plugin. In order to install the plugin, you will need to first navigate to the Plugins > Add New section within your WordPress dashboard, search for “Transients Manager” and click on the install button. Below is a screenshot on this
![]()
Upon completion of the installation, you may then proceed to activating it.
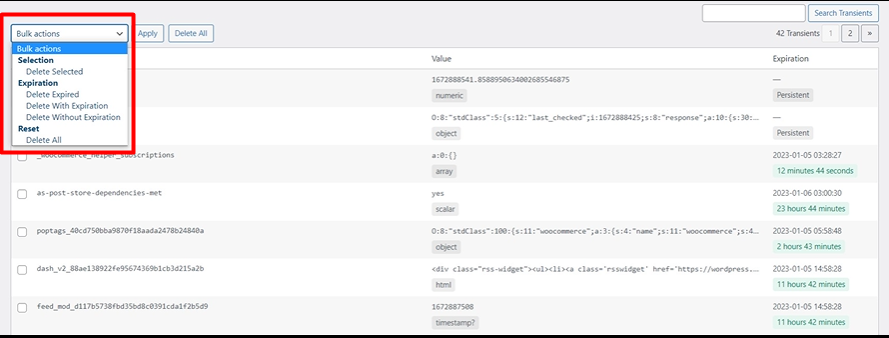
Once the plugin is setup, you can then access the Transients from the Tools > Transients section within your WordPress dashboard as seen in the screenshot below:
![]()
Within this section, the plugin enables you to carry out various bulk delete actions such as:
- Delete Selected Transients
- Delete Expired Transients
- Delete Transients with Expiration
- Delete Transients without Expiration
- Delete All Transients
Still within this section, you can also edit specific Transients. This can be achieved by clicking on the “edit” link upon hovering over the specific Transient.
![]()
On the next screen, you can then edit your desired Transient component(s) such as the Transient Name, Expiration time or value.
![]()
Once you are done editing a Transient, ensure that you save your changes.
Conclusion
Transients are quite helpful in themes and plugins as they cache data for a set amount of time within a WordPress site. They serve as a great option for themes and plugins that rely on external data or rely on a large amount of data. Usage of Transients in such cases helps in improving the overall performance of a website.
We do hope that this guide provides insights on how to use and manage Transients within your WordPress site. Should you have any questions, suggestions or comments, please feel free to utilize the comments section below.