By default you can easily create WordPress menus for your website but the created menu is rendered across all pages in your website. This can at times be seen as a limitation because in some cases, you may want to have different menus in different pages or different menus rendered to different users. As an example, rendering a “register” menu item to a logged in user is inappropriate.
Implementation of different menus in different conditions is not a flexibility that WordPress provides. Within this guide we will look into conditional logic and how you can implement it within your WordPress menus to display different menus under different conditions.
Table Of Contents
Importance of Conditional Logic in WordPress Menus
How To Add To Conditional Logic In WordPress Menus
- Display different WordPress menus for logged in and Logged out Users
- Display different WordPress menus for different user roles
- Display different WordPress menus in different pages
- Alternatives To The Conditional Menus plugin
What Is Conditional Logic
Conditional Logic is simply an automation set to occur if a certain criteria is met or else arrived at. Conditional logic is for example mainly seen in forms whereby if a specific option is enabled, then a specific field is displayed. This can for example be seen in WooCommerce checkout whereby if you select a specific payment gateway, the payment gateway fields are then rendered.
In our case here, we will explore conditional logic in menu contexts. Similar to payment gateway fields, you can have WordPress menus rendered based on a users’ action.
Importance of Conditional Logic in WordPress Menus
Conditional logic enables you to better the navigation within your WordPress website.
There are different scenarios where you would want to implement conditional logic on your menus. Some of these include:
i) Displaying different menus for logged in and logged out users.
ii) Rendering different menus across various pages.
iii) Displaying different menus for various user roles
The above are just a few of the cases where conditional logic in menus can be applicable. Later on within this guide, we will look into how to implement conditional logic in the above scenarios.
Setting Up a Navigation Menu
Most WordPress themes come with pre-set menus and menu locations. However, you may need to setup a menu navigation that suits your site functionality. For example, you may need to setup a menu that is rendered for archives and another one for normal pages.
In order to setup a navigation menu, you can do so by carrying out the following:
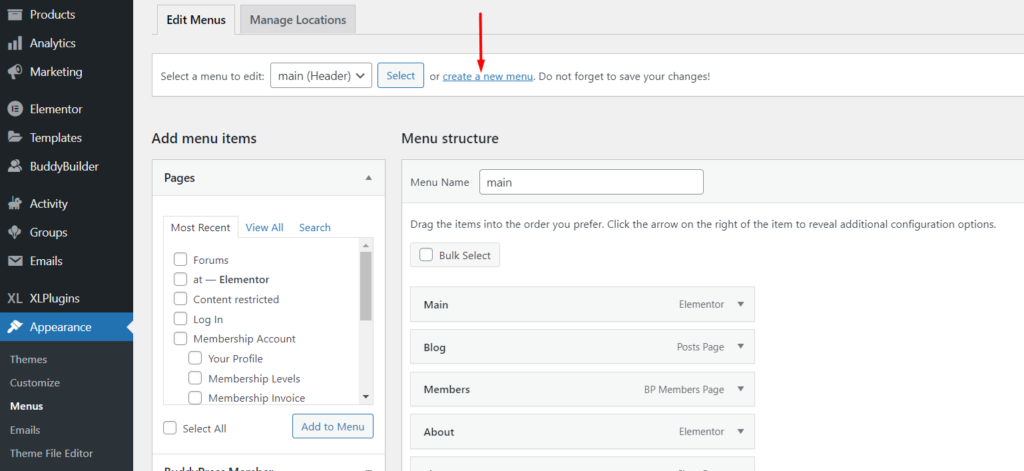
Navigate to the Appearance > Menus section within your WordPress dashboard

Click on the “Create a new Menu” link
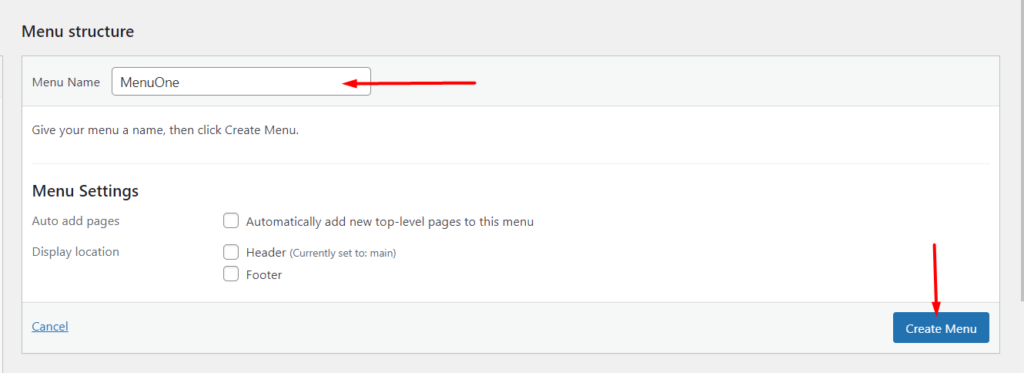
On the next screen, specify a menu name and click on the “Create Menu” button:
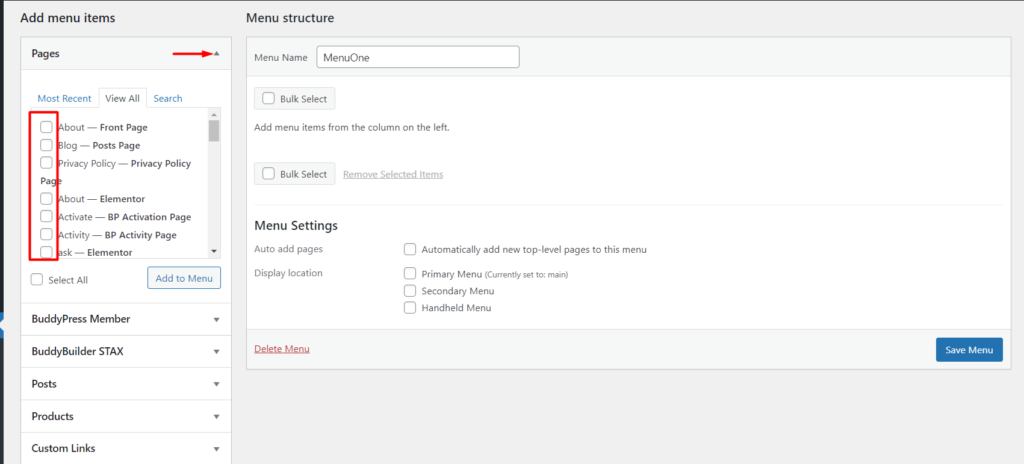
Next, from the left pane, you can then select the contents you wish to have rendered within the menus by clicking on the accordion icon and selecting the various menu items by selecting the various checkboxes.
Upon selecting menu items you desire to have under each accordion, add the menu items to the menu by clicking on the “Add to Menu” button on each.
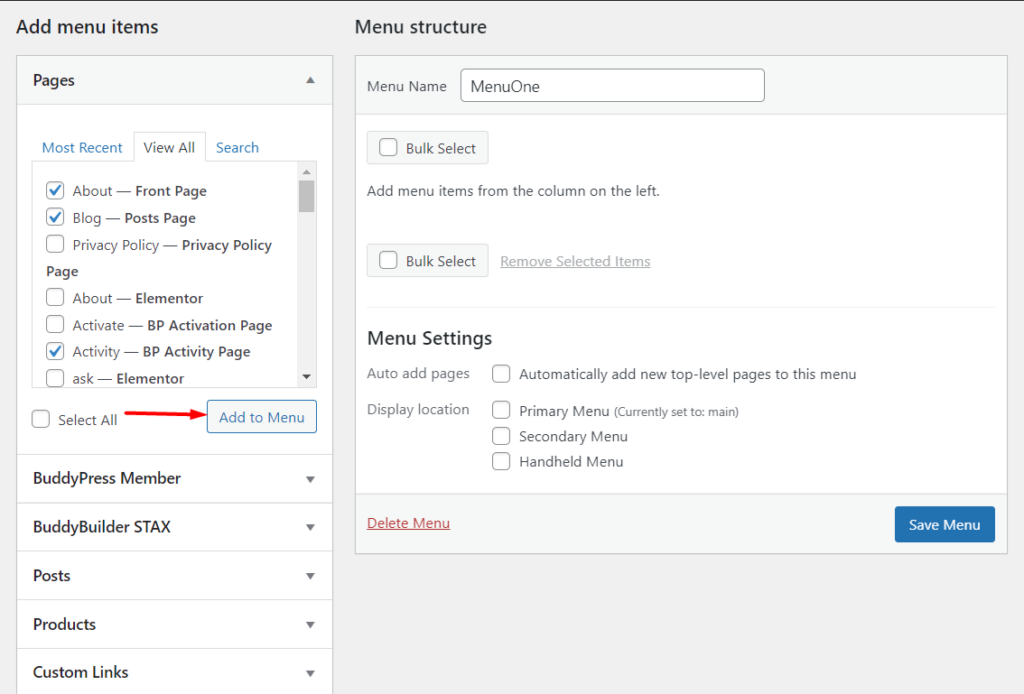
You can then drag and drop the menu items on the right based on your preferred order.
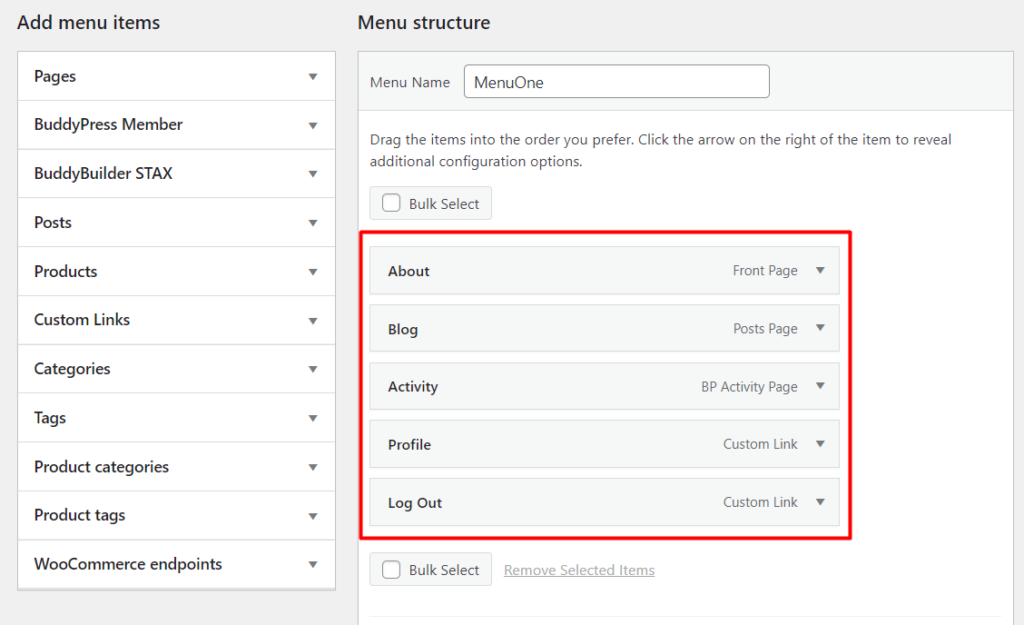
Below the menu items is also an option to specify the display location of the menu or else the section you wish to have the menu rendered. Different themes may have different menu locations.
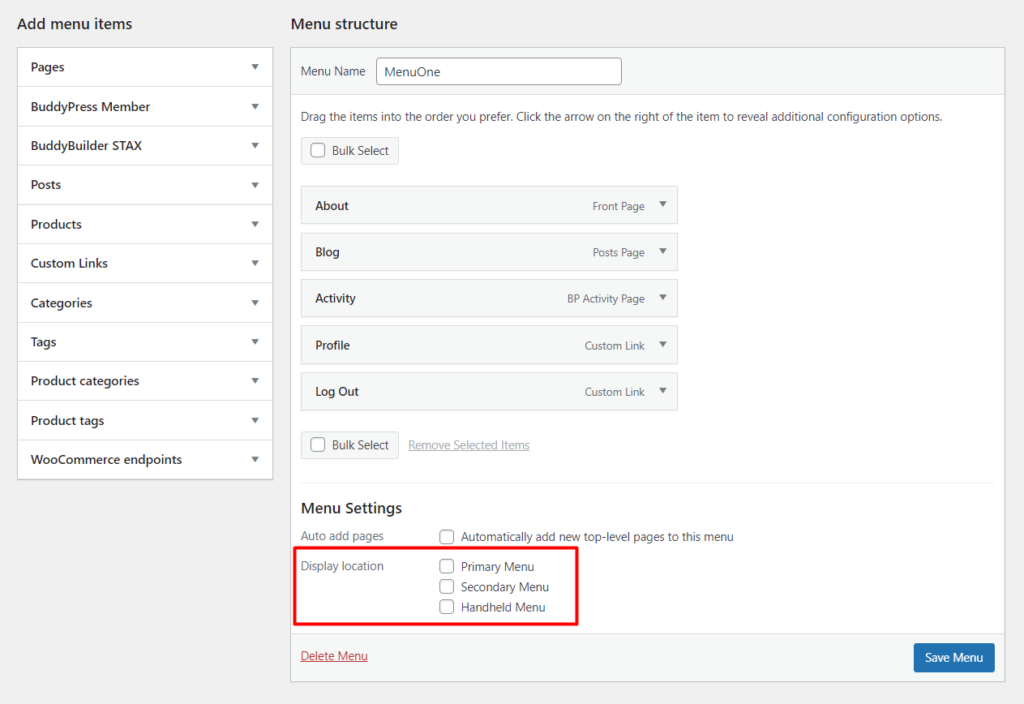
Once the above is carried out, ensure that you save the menu by clicking on the “Save Menu” button seen in the screenshot above.
How To Add To Conditional Logic In WordPress Menus
Conditional logic in WordPress menus can be added via custom code or using a plugin. In our case here, we will use the Conditional Menus plugin.
The Conditional Menus plugin is a free plugin and you can set it up by carrying out the steps below:
Navigate to the Plugins > Add New section within your WordPress dashboard
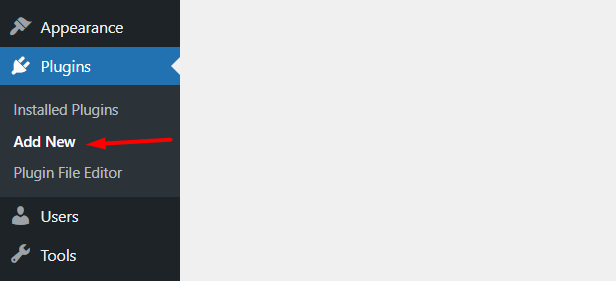
Search for the “Conditional Menus” plugin
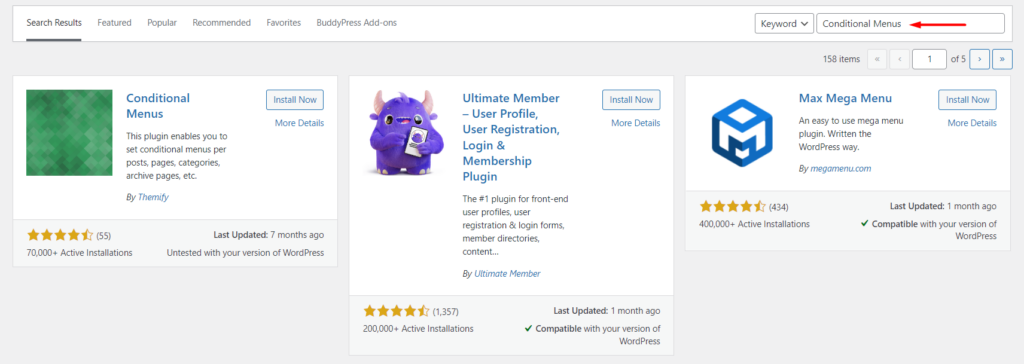
Proceed to installing and activating the plugin
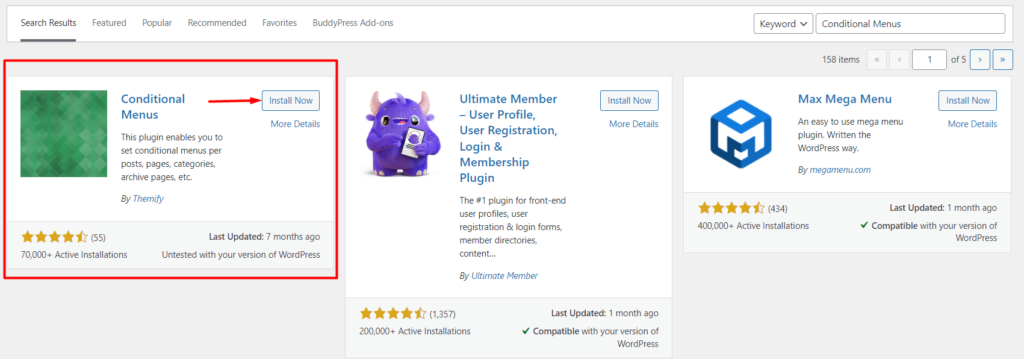
Display different WordPress menus for logged in and Logged out Users
In various cases, it is important to display different WordPress menus for logged in users and logged out users. For example if you are running an online store, this functionality may actually come in handy. So as to achieve such an implementation, you will need to carry out the following:
i) First setup two different menus. One to serve as the menu for logged in users and the other for logged out users. You can utilize the steps mentioned within the “Setting Up a Navigation Menu” section.
ii) Navigate to the Appearance > Menus > Manage Locations section
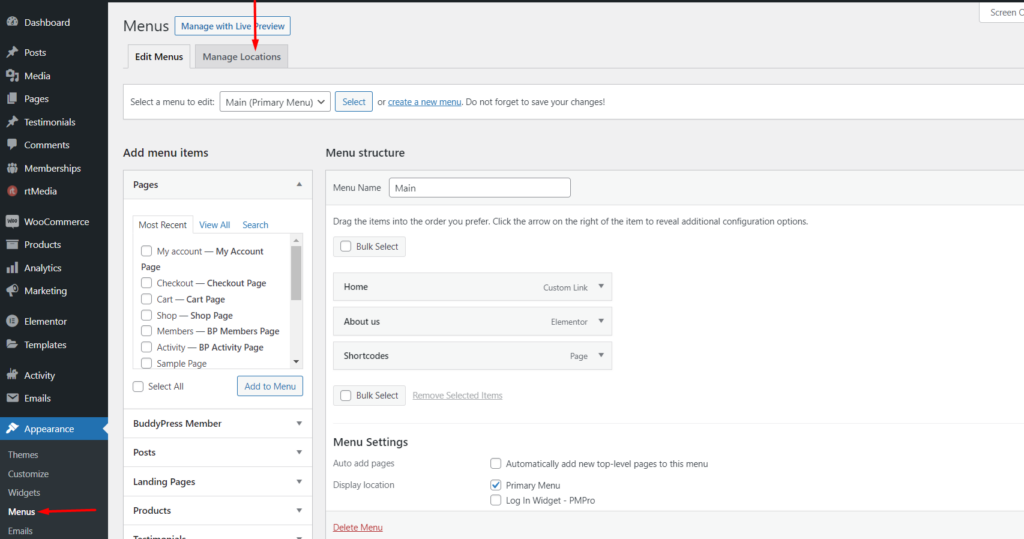
iii) Next, within the theme location where you would wish to have the menu rendered, click on the “Conditional menu” link
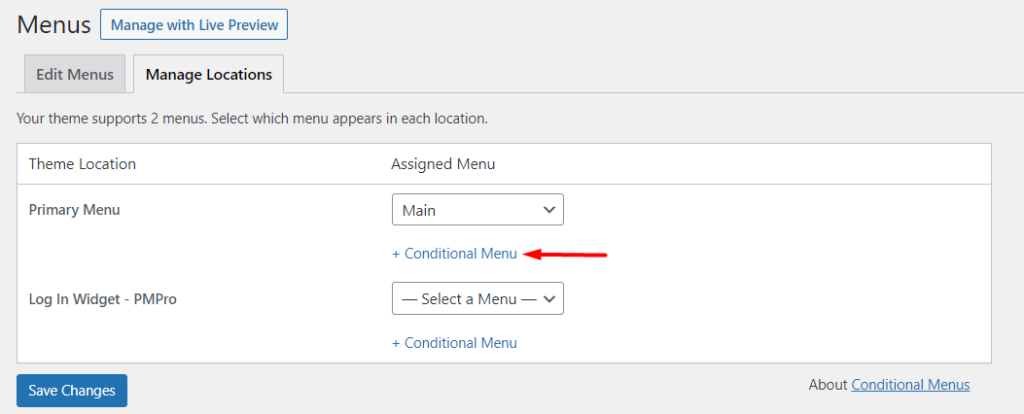
iv) Select the menu that you want to have displayed for logged in users
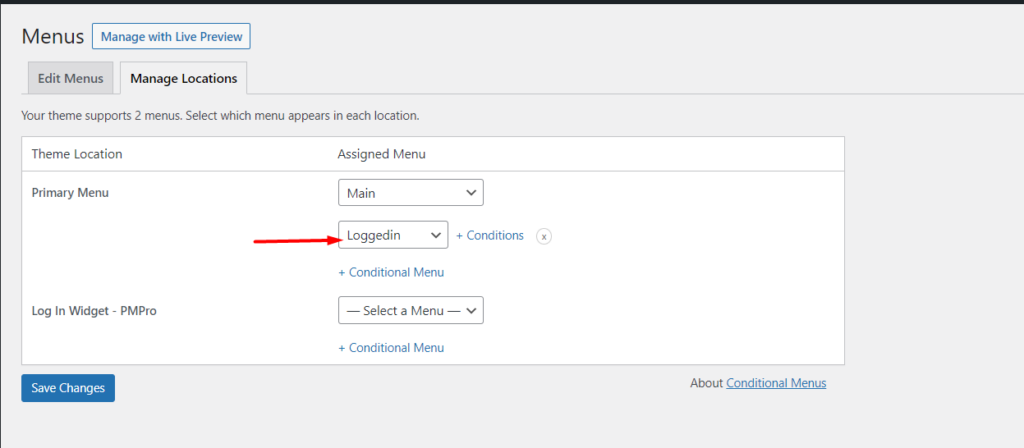
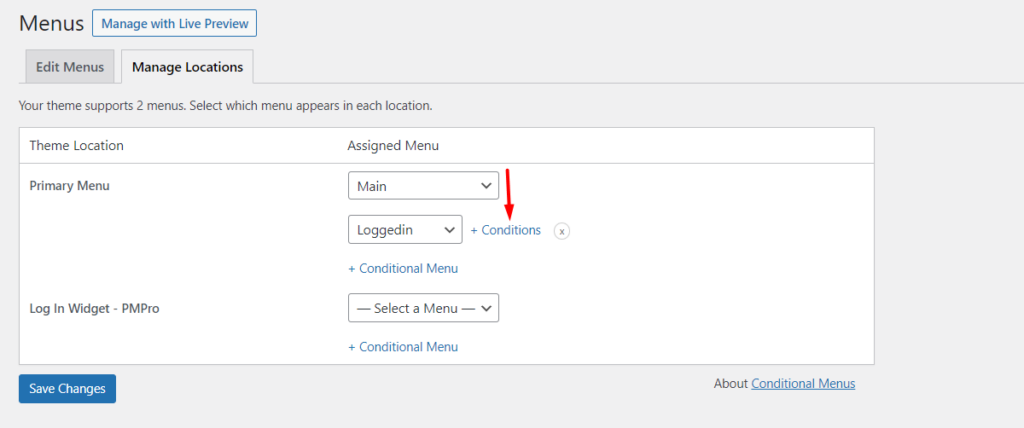
v) Click on the conditions link
vi) On the popup rendered, select the option “User Logged in” that is present within the General tab
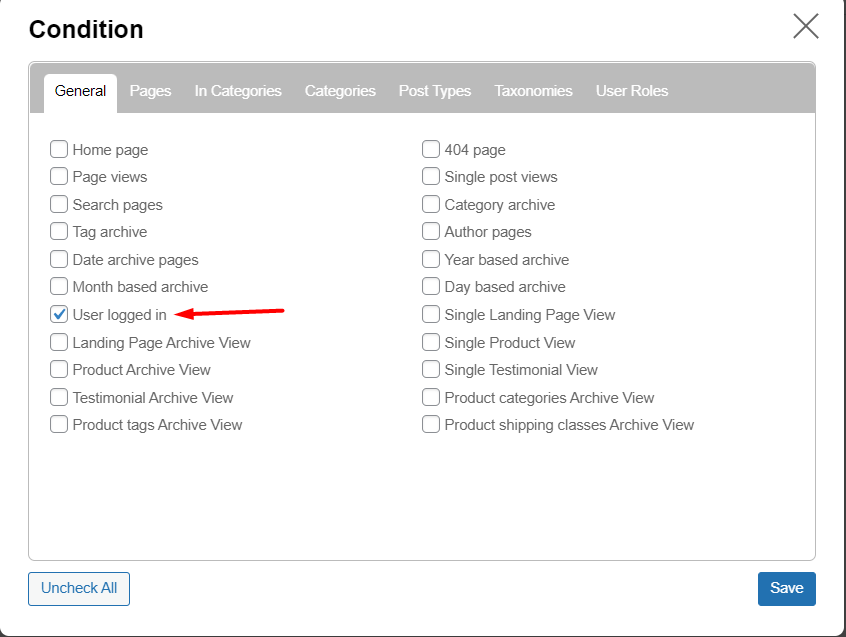
vii) Save all your changes
Once you now try accessing the website while logged in, you will now notice that the logged in menu will be rendered within the site. Below is a sample illustration based on our example here:

If you also happen to preview the site while logged out, you will notice that the default menu is rendered. Below is a sample on this:

Display different WordPress menus for different user roles
With the help of the conditional menus plugin, it is possible to render different WordPress menus for different user roles. Similar to the display of different menus for logged in and logged out users, you will need to first setup different menus for the different user roles from the Appearance > Menus section. Once this is done:
i) Navigate to the Appearance > Menu > Manage Locations section
ii) Next, click on the “Conditional Menu” link
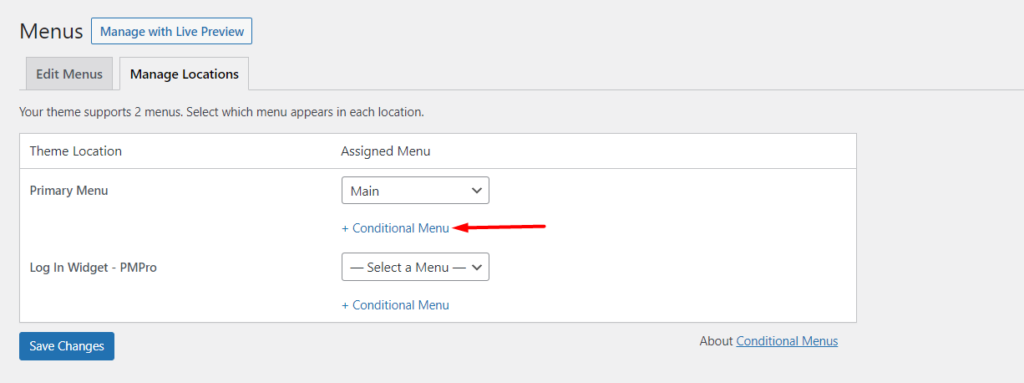
iii) Once this is done, specify the menu for your desired user role
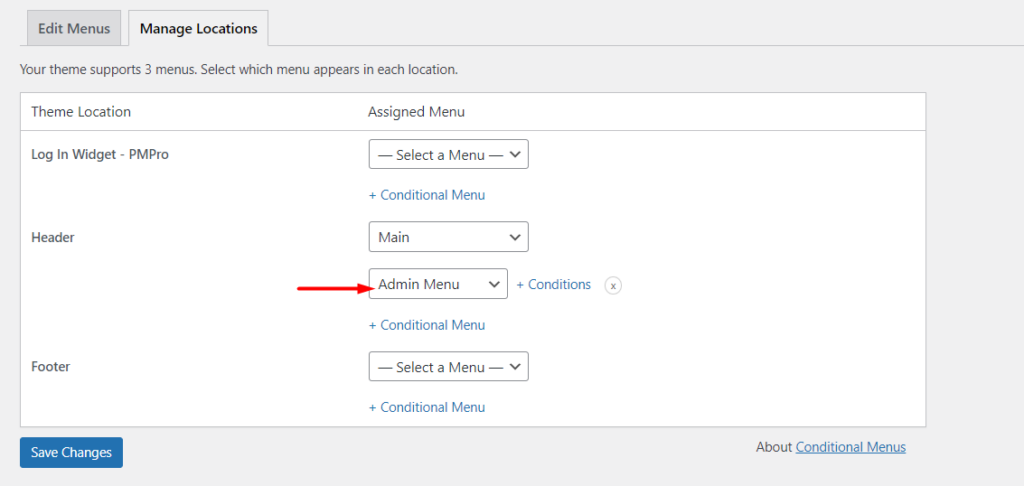
iv) Click on the “Conditions” link seen in the screenshot above and within the popup rendered, access the “User Roles” tab and specify the user role that will be in a position to view the specific menu
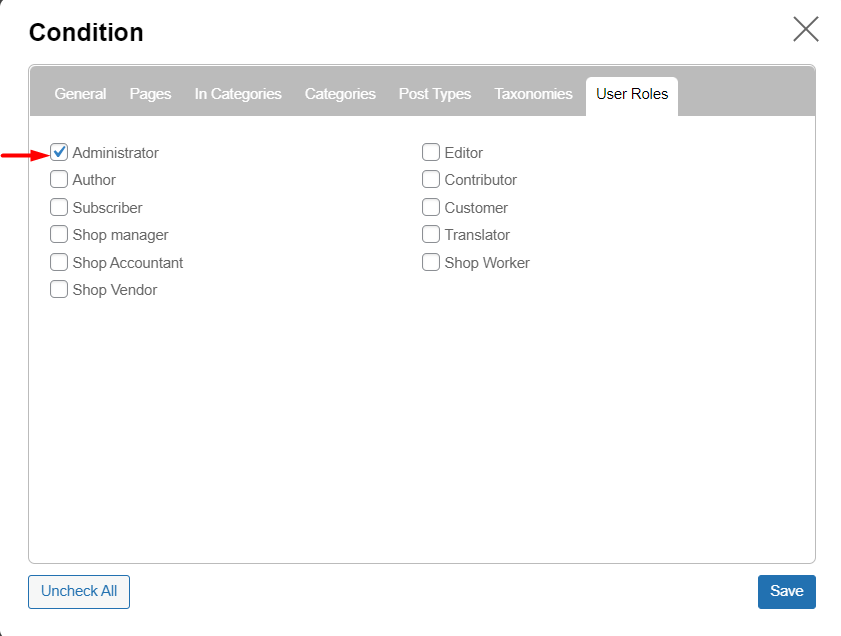
v) Save your changes
Upon previewing the menu as an administrator in our case here, you will notice that the set menu is what will be rendered. Below is a sample screenshot on this:

Display different WordPress menus in different pages
The conditional menu plugin can also be used in rendering different WordPress menus in different pages.
Similar to the other applications discussed above, you will need to first setup a menu from the Appearance > menu section. This menu will be used in the page where you want to have a different menu rendered.
Upon doing so, navigate to the Manage Locations section and select the menu that you wish to have rendered.
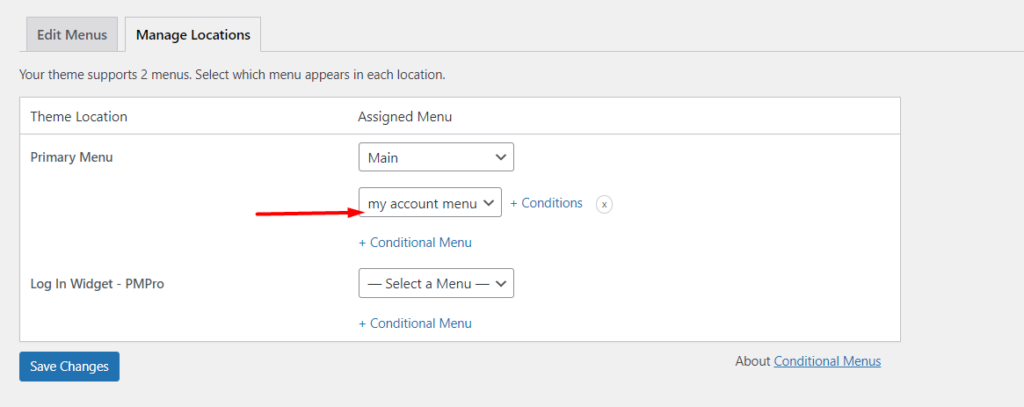
Next, click on the conditions link seen in the above screenshot
Within the popup rendered, navigate to the “Pages” section and select the page within which you want to have the menu rendered.
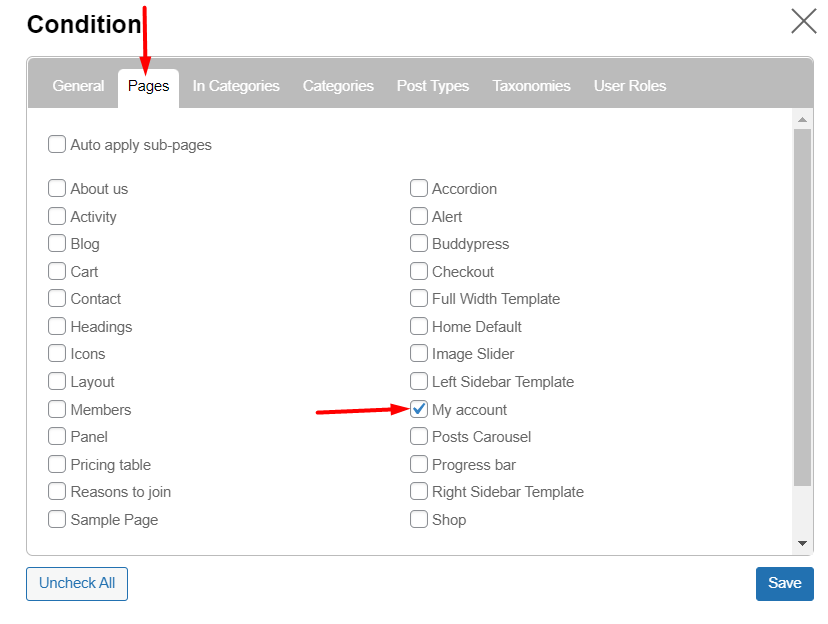
Once this is done, save all the changes.
Upon previewing the set page, in our case here “My account”, you will notice that the menu is applied. Below is a sample screenshot on this:

Alternatives To The Conditional Menus plugin
Apart from the Conditional Menus plugin, there are quite a number of other plugins that can also give you control over your menus. Some of the plugins that you may consider include:
1. User Menus – Nav Menu Visibility

User menus is a free plugin and can be used to control the visibility of specific menu items mainly for websites that involve logged in users.
With the plugin, you are in a position to specify who can see the specific menu link(s) (specific user roles, logged out users or everyone).
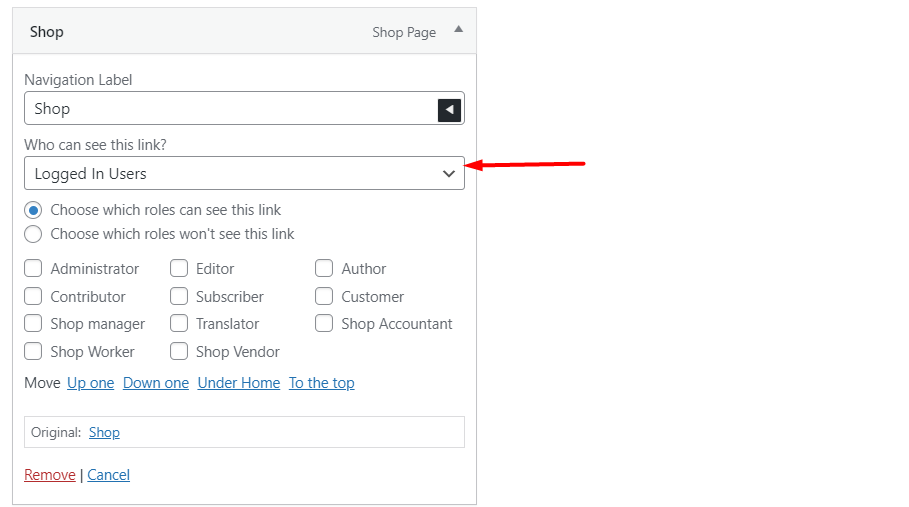
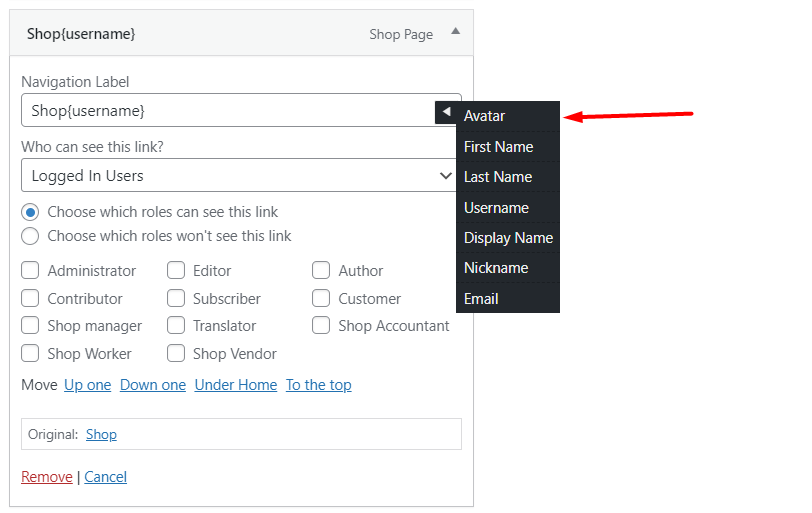
The plugin does also enable you add user information that will be rendered within the menu item navigation label as illustrated below:
2. If Menu – Visibility control for Menus

The If Menu plugin enables you to control visibility of your menu items. With the help of the plugin, you are in a position to specify the visibility conditions below:
- Visibility based on User role
- Visibility based on whether a user is logged in
- Visibility based on page type
- Visibility based on whether the visitors’ device is a mobile device
You can also purchase the More Visibility Rules addon if you wish to incorporate more visibility features within your menu items. Some of these features include:
- Visibility based on Membership and subscriptions
- Visibility based on visitor location
- Visibility based on visitor’s language
Conclusion
Using different menus within your WordPress site helps in generating a great user experience when navigating your site. This is for example realized by rendering menus that are relevant only to the users based on the specified conditions.
Within this guide, we have looked into how you can implement conditional logic within WordPress menus. We do hope that this information is helpful in rendering different menus based on the set and desired condition.
Should you have any feedback, questions or suggestions, please feel free to utilize the comments section down below.




No Comments
Leave a comment Cancel